Lovegood; Or, Yes I Can Make a Cardi

This is a throwback to a post published on July 16, 2008.
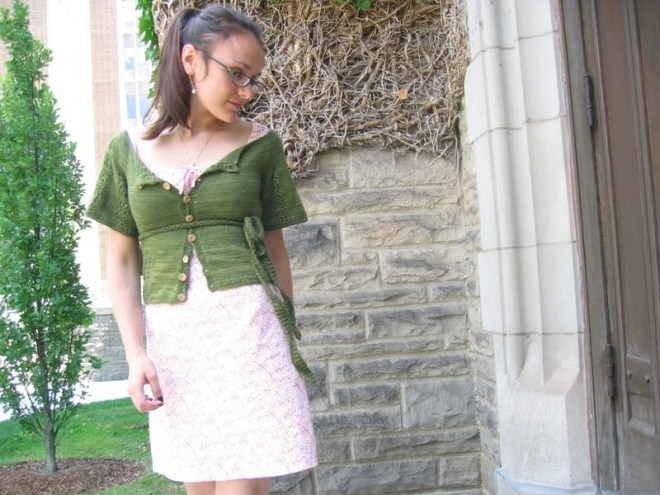
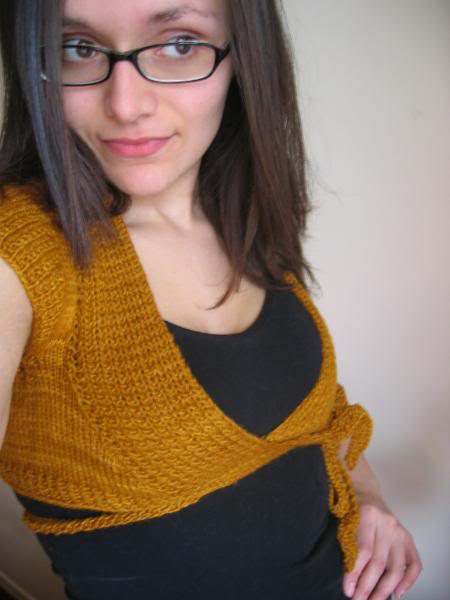
DOWNLOAD NOW

Howdy from a sunny July day and the just-finished Lovegood.
lovegood038
Pattern: Lovegood
Yarn: about 3.5 balls of Manos Silk BlendI likes this yarn so very much.
I don’t think I can say that enough.
lovegood019
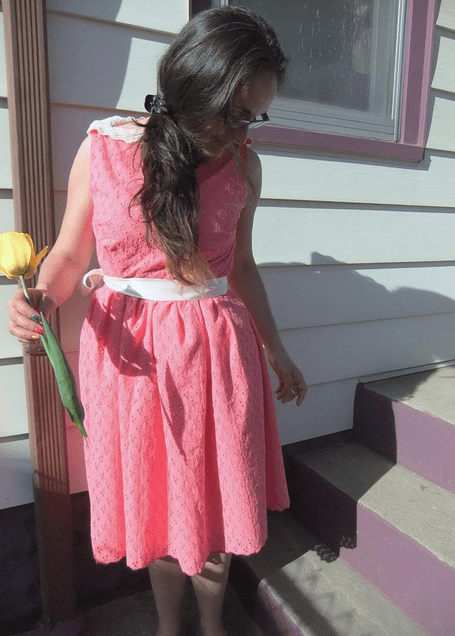
Originally I was envisioning belt loops for this one, and the ability to wear said belt at either just under the bust or natural waistline. As it happens, I’ve made it a touch too short to wear the belt at my waist. Methinks it’d look a bit funny. And, the belt stays put, so no need to add the loops.

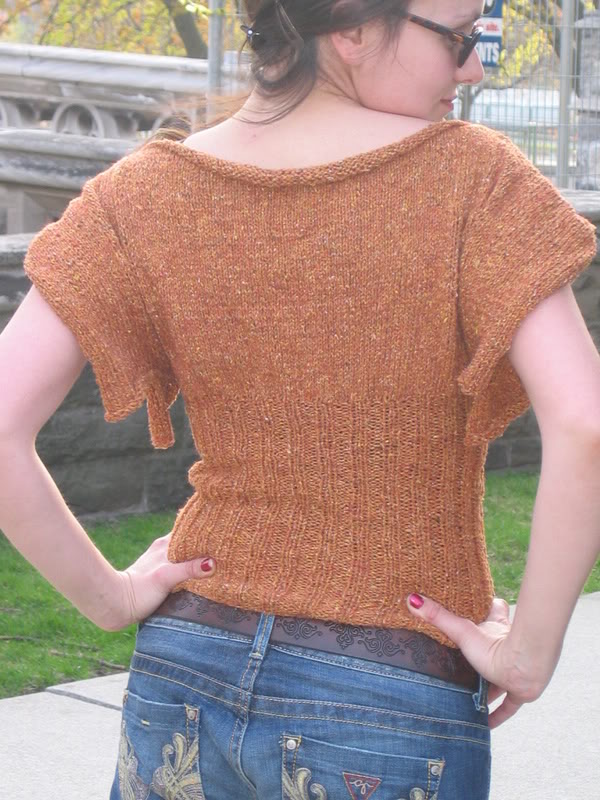
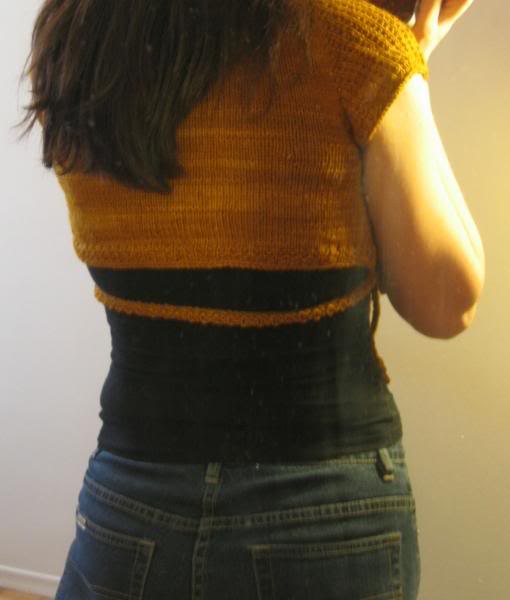
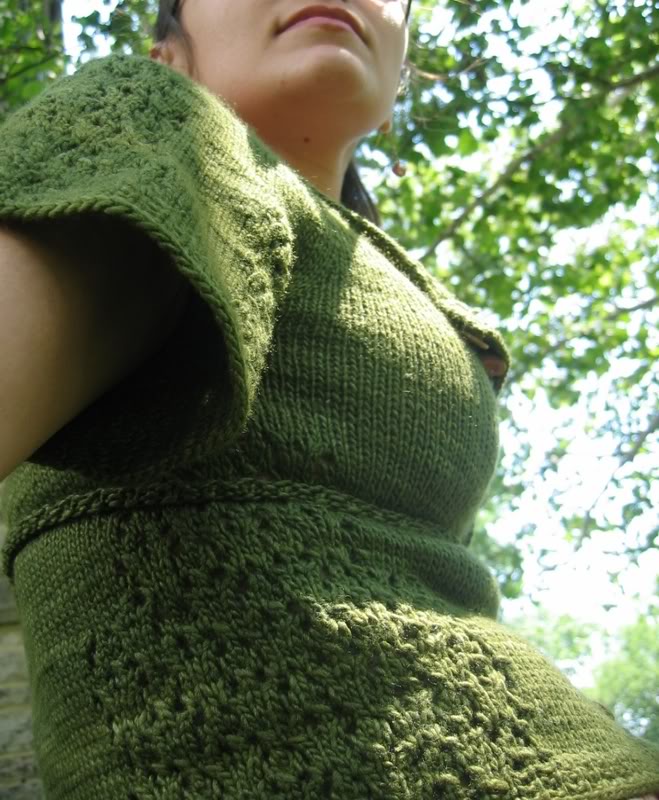
The neckline turned out how I wanted (thankfully!) in that I wanted it wide and almost off the shoulders. The sleeves aren’t as big and flowy as I wanted, but I’m satisfied with them.

I’m undecided about the wood buttons, though. In my zeal to get this one completed, I grabbed the only flat-fronted, right-sized wood buttons the store had – and now I suspect they’re too contrastive to the yarn. * le sigh.
lovegood027
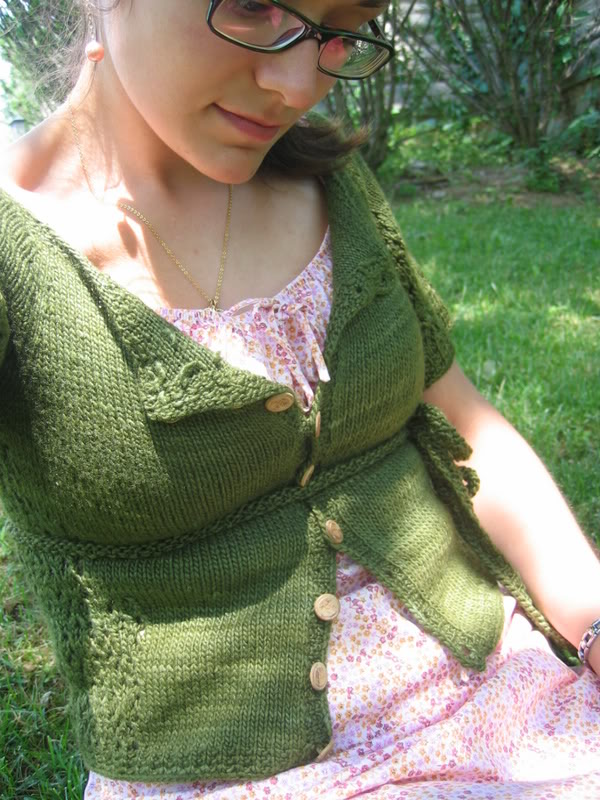
But, my enthusiasm level for this one remains at the moderately high level (I gave it the smiley, but not super-smiley, face on Rav). It’s certainly wearable and much needed for my summertime wardrobe.

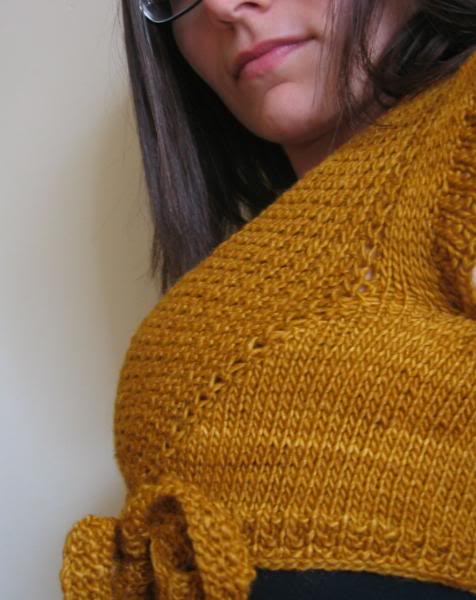
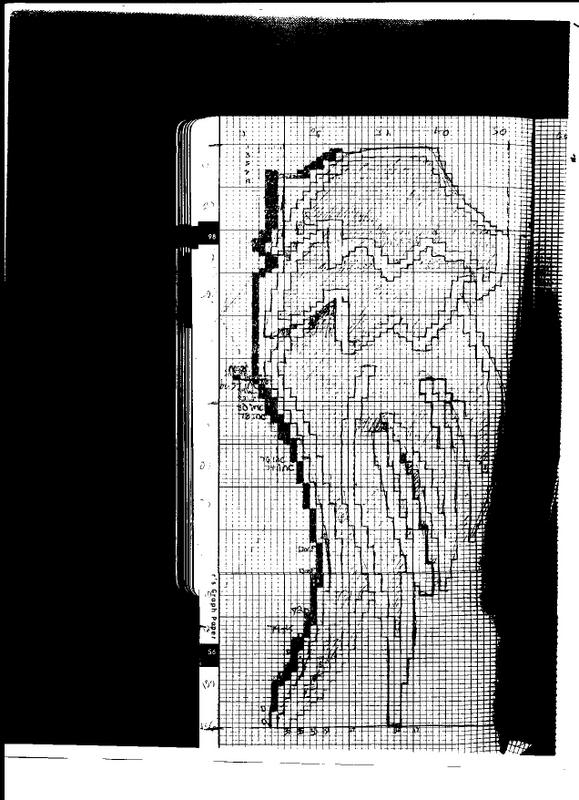
The lace panels are just “Snowflake Lace” from one of my few stitch dictionaries.

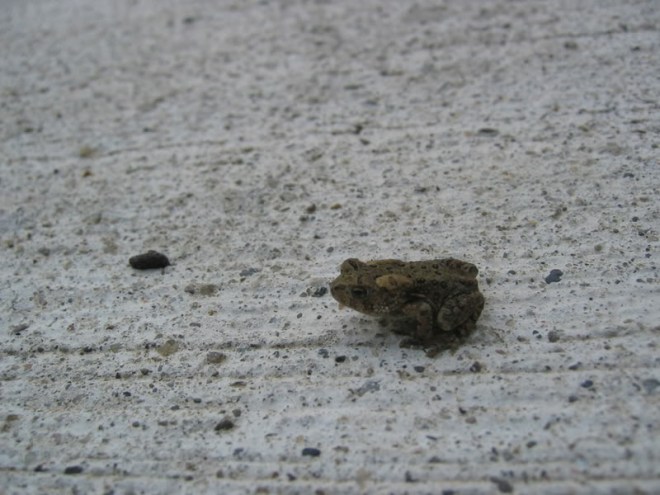
And here’s a little guy who hopped on by during the outdoors photo shoot.

lovegood036

******Pattern NOTES*******

Lovegood Cardigan Notes
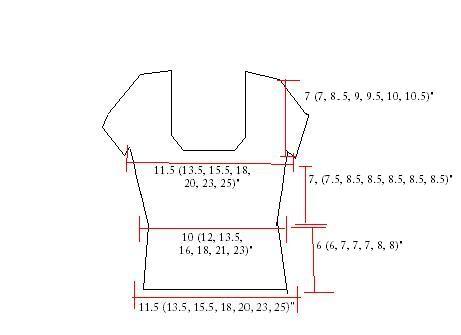
Size:
Made to fit me, which is approx 35” bust.

Materials:
3.5 hanks of Manos Silk Blend
9 buttons (15mm across)

Needles:
3mm, 3.5mm, and 4 mm circular needles

Gauge:
(Don’t ask how, but)
On 3mm – 5.5 sts/1”
On 3.5mm – 5.5sts/1”
On 4 mm – 5 sts/1”

Cast on 165 sts using 3mm circs.
Divide stitches with place markers as follows:
28 (for left front)
27 (for left sleeve)
56 (for back)
27 (for right sleeve)
28 (for right front)

Do garter rib for 6 rows.

GARTER RIB:
Right side: K1, p1 to end.
Wrong side: Purl across.On next Right Side (RS) row:
Switch to knitting in stockinette st.
Begin raglan increases.
To do this: increase one stitch on each side of each place marker each right side row.

AT THE SAME TIME:
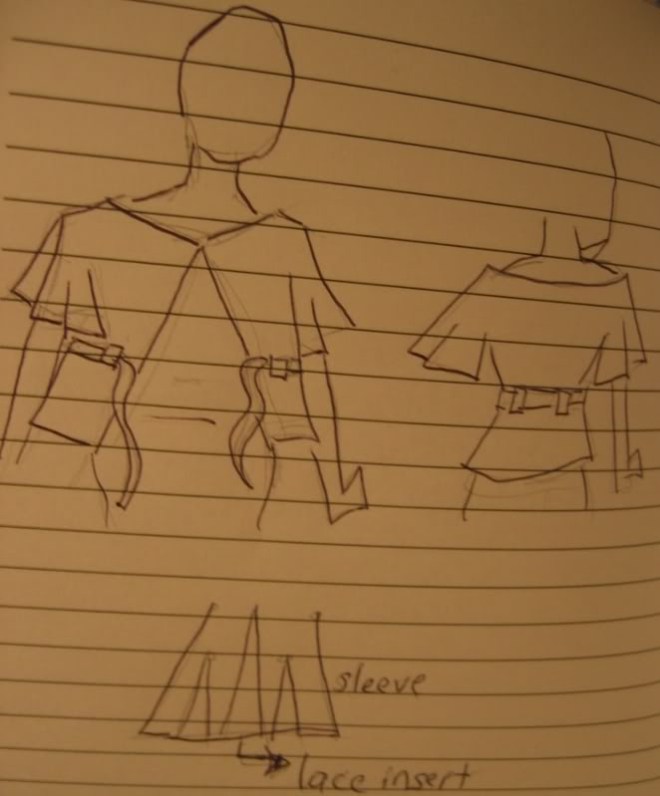
Begin lace panel on arms. Place this in the middle of the arm.

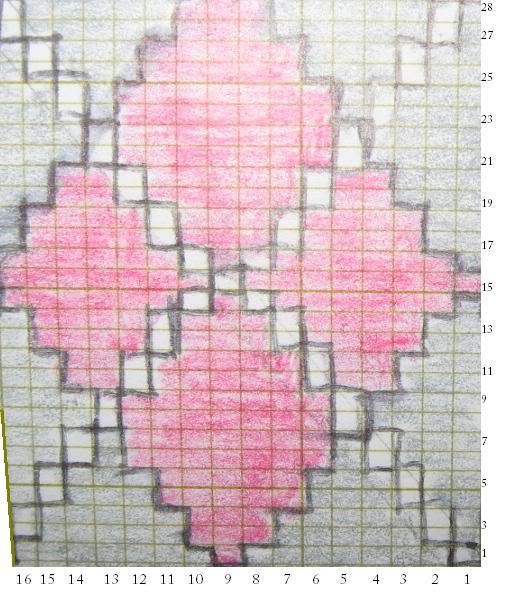
LACE PANEL (6+1 multiples)
Row 1 – knit 1 *yo, skpo, k1, k2tog, yo, k1. Repeat from * to end
Row 2 – and all wrong side rows, Purl to end
Row 3 – Knit 2, *yo, knit 3. Repeat from * to last 2 sts, then yo, knit 2.
Row 5 – Knit 2 together, yo, skpo, knit 1, knit 2 together, *yo, sl 1, knit 2 together, psso, yo, skpo, k1, knit 2 together. Repeat from * to last 2 sts, then yo, sl1, psso.
Row 7 – knit 1, *knit 2 together, yo, knit 1, skpo, knit 1. Repeat from * to end.
Row 9 – Work like row 3.
Row 11 – knit 2, * knit 2 together, yo, sl1, knit 2 together, psso, yo, skpo, k1. Repeat from * to end.

Work this way, making raglan increases and knitting lace panel, until piece measures 2” from the cast on. Switch to 3.5 mm needles.
Add two more lace panels on each arm.
To do this: place them halfway between the original lace panel and each stitch marker.
Continue in this manner, creating raglan increases and working each arm’s 3 lace panels, until piece measures approx. 5” from the cast on.
At this point the arms should have a couple inches of positive ease on your arm.

Now place all of each sleeve’s stitches on waste yarn, and knit across all body stitches.
Place a lace panel directly under each arm pit.
Work back and forth across body, knitting each side’s lace panel for approx. 2.5”.
Switch to 4 mm needles.
Add a lace panel to each side of already established lace panels.
Work in this manner, knitting stockinette across and 3-repeat wide lace panels under each armpit for approx. 2.5”.
Now add one more lace repeat to each side of each panel. Now you’re repeating the lace 5 times on each side of the garment’s body.
Knit in this manner for approx. 4”.

Begin Garter Rib for bottom:
Switch to 3.5mm needles, and work garter rib for 6 rows.
Cast off.

Sleeves:
Take stitches off waste yarn and begin knitting in established pattern with 3.5mm needles for 1”.
Switch to 4 mm needles, and knit in established pattern until arm measures approx. 4” from armpit.
Work 6 rows of garter rib.
Cast off.

Button Band:
Using 3mm needles, pick up every 3 of 4 sts, for a total of 81.
Work garter rib for 6 rows.
Cast off.

Button Hole Band:
Using 3mm needles, pick up every 3 of 4 sts for a total of 81.
Work garter rib for 2 rows.
Make buttonholes:
RIGHT SIDE: Knit 2 sts in pattern, cast off 2, continue in pattern. Repeat this so that buttonholes are approx. 1.5” from each other. There should be 9 buttonholes. (When I made mine, I placed them a little askew. But I blocked it out, and you can’t tell the off-placement).
Next row: WRONG SIDE: purling across all stitches, cast on for the two stitches you cast off on the previous row in the places where they’re missing.
Knit one more row in pattern, then cast off all stitches.

Belt: Cast on 331 sts with 4 mm needles.
Do 6 rows of garter rib.
This makes a belt that’s just over 5 feet long.
____________________
Errata:

  • Number of stitches to cast on: 166
  • Number of stitches for the lace pattern : 6+6+1 (if you want all the instructions to be done)
  • The 3 omissions in rows 5, and 11 of the lace pattern
    (added March 2011)


Lovegood; Or, Yes I Can Make a Cardi

Me Made May 2013

This is a throwback post, originally published on May 8, 2013. Reposted now as part of my MMMay18 celebration!

I’m a twitter kinda kid. I dig it.

And on the twitters, my feed has been flooded as of late with beautiful projects from people, hastaged #memademay13 (or something to that effect).

Here’s what it’s about: but basically, make stuff in May!

I’m sort of automatically doing that, knitwear-design-wise, but this whole discovery of Me Made May (MMM’13) seredipitously collided with my SPRING FEVER. Srsly, I have never been so alight with excitement for spring. It’s ignited a desire for pretty me-made dresses.

And that is what I’m hoping to do with my MMM’13.

It’s challenging for me, as I’m not a big sewer. I mean, I have made the odd costume, but that’s a costume. No one will fault you if your hems are wonky (or, you know, held up by copious safety pins).

I’ve been picking up kickass vintage sewing patterns from the second hand shop for years now. The sewing desire has been laying dormant for quite a while.
Here you see some of them.

mmm
My vintage patterns – with a contemporary Cynthia Rowley one thrown in there too!

I’m hoping to chronicle some more sewing adventures this MMM’13, because, you know, I like to keep busy people!

Here’s the first piece I’ve finished (though technically I’ve been working on it since April. Not sure if it really counts as MMM!)

mmmm

Me Made May 2013

Me Made May: A Journey

It’s May! And you know what THAT means! It’s time to bust out your me-made clothes and share your talent with the world! You’ll find me hashtagging my heart out on IG for #mmmay18. I’ve made it something of a tradition the last few years. It’s a great way to celebrate your passion for making; hang out on the hashtag and find loads of inspiration!

If you’ve never heard of Me Made May before, it’s essentially a self-guided way to engage in making and using your me made clothes. In whatever way that works for you. The originator of the event is So Zo, and I love how open she’s made it. Would you like to learn a new skill? Increase your making? Utilize your handmade wardrobe? All of that works!

Personally, I’m participating with the goal of making most of what I wear every day my handmade items. I have so many handmade clothes that I pretty much wear something by me every day anyhow! I usually like to use MMMay to create more items, but this May is SUPER busy for me so I’ve scaled back that angle of the challenge and will focus on using and loving what I have.

I’m also copycatting a pal of mine Allyson Dykhuizen and taking MMMay as an opportunity to see the gaps in my handmade wardrobe. Analyzing this way will help me make better-informed choices about what to make next. For example, I suspect I don’t have enough shorts for the warmer weather, but is this really so? I’ll report back by the end of the month!

I love taking this opportunity to cruise around on the hashtag and see all the wonderful, creative things folks make and share. It’s so inspirational!

Over the next few days I’ll be sharing some throwback MMMay posts from my blog. Stay tuned to see how my MMMay has evolved over the past few years 🙂

Are you participating? What’s your goal? Let me know in the comments below!

___________________________________

Here’s the first #MMMay throwback post, originally published on May 11, 2015.

Remember the other week, when I shared with you all how much I love instagram? Well, here is another reason why it’s great: Me Made May.

mmm

I’ve semi-participated in this month-long make-along before. Essentially, you make at your own pace (many of the makers are sewing their clothing, but knitters and other makers join too!).

This year I’ve noticed that some people (me included) have altered that focus from just making to making and sharing what you’re already made.
Posting a photo a day on instagram, I’ve been more aware of how much handmade I really do wear daily, and appreciative for this collection of carefully crafted clothing and accessories I’ve complied over the years.

Want to see what I’m sharing? This photo gives you a preview of my first six days, but hop on to instagram to see more! Some of the tags you can look up to see even more people’s handmades for Me Made May are: #MeMadeMay #mmm15 #mmmay2015.

Me Made May: A Journey

Miss Lovegood in Love with Manos

This is a throwback to a post published on July 10, 2008.

Yes yes, those damn books have done it again (more specifically, those damn movies) and given me an idea for a new knit.

tg
I do realize that this is crocheted, and that it’s been done already, but my idea slightly varies from the original.
Here’s what I gots so far.
lovegood004
And here’s a preliminary sketch.
lovegood005
I was thinking of something that would be more figure-flattering than the movie version. Something I can cinch. Generally loose-fitting garments don’t float my proverbial boat.

Once I get to the “finishing details” point, I’m going to have to make a decision: where to place the belt.
First I was thinking “duh, at the natural waistline”, but methinks this will be a rather short cardi, and might look funny with a belt placed at that point.
A second option I came up with was to put it right under the bustline – an empire-waisted cardi.

I’ll get pics up of each option shortly.

On a yarnny note: I am so very much in love with Manos Silk Blend. Buy it now! I’ve used it for this knit as well as Hew, and it behaves very well and looks absolutely lovely.

Miss Lovegood in Love with Manos

Knit-Strology; Or, Extrapolations Based on General and Specific Nonsense – Taurus

Once every month, I’ll be re-posting from the old blog all the Knitstrology posts

This one was originally posted on January 12, 2012.

Sketching a Personality; Or, How I Have fun with Knitting and Astrology

Taurus: The Sign of the Bull Photobucket
April 21 – May 21

Hiya Taurus!

You’re the knitter that will sit there and frog and frog and frog. You’ll frog something for yourself. Not because you’re a perfectionist, but because you’re patient. You’ll find your knitting friends will hand you their projects to frog, their stubborn skeins to untangle. That’s because you’re just as stubborn as that knotted skein!

It’s also claimed that your lazy streak could lead you to simply drop a troublesome project – I prefer to think you’ll take that bull by the horns and utilize your persistence (read: stubbornness) to a positive end.

Taurus are sensual, as in, taking delight in all the senses. This leads you to pick a pleasantly textured yarn, comfy warm sweater, snuggliest seat in the house and most delicious snack to nestle down with to do your knitting.
You are very practical, though, and while you love the luxurious softness of the qiviut, you’re much more likely to pick up that soft blue (and reasonably priced!) superwash merino.

Your practical nature also leads you to be very adept in knitting emergency situations. Yet another reason why your (perhaps more impulsive and impatient) fellow knitters hand you their frustrating project! You’re a very reliable friend.

With your respect for tradition and established, reliable techniques, you might not be the first person to jump on the trend bandwagon. You’ll be the one utilizing the successful, good, well-tried skills and will generously help anyone experiencing issues with their new-fangled work.

Taurus rule the neck and throat; you have a plethora of projects that would suit you wonderfully! Pull out that scarf pattern, knit yourself a quick cowl.
Try to start your projects on Mondays or Fridays – they’re your lucky days.
Stuck on what colour yarn to pick? Taurus’ lucky colours are blue and blue-green. Very soothing for those bulls!

Want to knit your own personalized astrological sign pillow? Check out my “What’s Your Sign?” design!

What’s Your Sign?


Knit-Strology; Or, Extrapolations Based on General and Specific Nonsense – Taurus

Flying Fox: Here Comes the Summer

This is a throwback to a post published on April 28, 2008.

Call me the procrastination knitter: when I set myself to get something done, I end up knitting something else instead.
Here’s an example:

ff005-1

Pattern: Flying Fox (notes posted below)
Yarn: almost 5 entire skeins of Elsebeth Lavold Silky Tweed

I’m semi-pleased by the way this one turned out.
I originally had envisioned incredible batwing sleeves for this knit (hence the name – oh how I love naming the knits!). Unfortunately, my impatience to get this one on the way had me skipping important forethought regarding the shaping. I’m sure if I actually thought about it, I could have made it look more like the vision in my mind.
I also had to exercise some big-time will power to refrain from gussying this one up. As you can see (if you’re familiar with any of my other designs) I gravitate towards the prettily-detailed. This one is decidedly minimalist. This was a tactic, so that I could focus on the drapey sleeves and neckline.

ff006

I fear the yarn is discontinued: I read that somewhere on the internets. Then again, I read lots of stuff on the internets. I hope it isn’t, because I really really love this yarn. Lovely and drapey.

ff003

Please don’t mind the smirky grin on me face.

Awaiting me at home is yet more procrastin-knitting. I’ve just had some golden Debbie Bliss Pure Silk wound into usable yarn-balls. There’s also some scarletty bamboo that’s calling my name.
And here comes the summer!
*****
Pattern notes:

gauge – 22 sts=4″ on 4 mm needles

Cast on 108. Join for knitting in the round.
Place marker at the beginning of the round; work 2×2 ribbing across 54 sts, place marker, work 2×2 ribbing for the rest of the round.
Knit 2×2 ribbing for 11″.

When piece measures 11″, work increase row:
You will begin working back and forth.
*increase 1 st into next 3 sts, knit 1*
repeat until you reach side marker, increase into last 2 sts
(95 sts across the front now)

Slip marker, add new yarn, increase into first st, knit 1,
*increase 1 st into next 3 sts, knit 1* repeat until next marker.
This is the back. I recommend leaving this side to work until you’ve completed the front.

Working the front:
Turn work to wrong side facing, purl across.
Next row: Right side facing, knit across.
Next row: Wrong side facing, cast on 24 sts, purl across, place marker after these 24 sts, purl across sts, place marker, cast on 24 sts.
Next row: Right side facing, knit across all sts.

Knit these 119 sts until sleeve measures 2.5″.
At 2.5″, work as follows until sleeve measures 4.5″:
Right side facing – knit across sleeve, slip marker, decrease one st, knit across front until 2 sts before marker, decrease one st, slip marker, work across sleeve to end of row.
Wrong side: purl.

When sleeve measures 4.5″:
stop working these decreases, and simply knit the right side of the work and purl the back until the sleeve measures 8″.

When sleeve measures 8″:
Right side facing: Decrease 2 sts at each end of every row five times.
Wrong side: purl.

After you’ve completed all 5 decrease rows, cast off.

Work back same as front.

Sewing back and front together:
I simply stitched the front and back together, beginning at the first decrease-row worked when the sleeve was 8″ long.
(the sleeve will be slightly curved here. I just began stitching at this curve).
I stitched each side together for 5 inches.
******


Flying Fox: Here Comes the Summer

Hew; or, what I did in Toronto

This is a throwback to a post published on March 7, 2008.

I’d like to announce to the knitworld that I love Manos Silk.
Here’s what it told me to make it into:
knits048
Pattern: Hew (available as a pdf download on Ravelry. I have, rather unfortunately, not figured out the delicate art of pdf-ing).
Yarn: 2 skeins of Manos Silk

knits043

This pattern was a bit of a departure for me. Usually I think on a design for quite a while, sketching and dreaming. Hew just grew itself, in a manner that I’m certainly not used to when it comes to knitting. It was a very organic process, which brought me to a wearable and rather enjoyable finished garment.

knits067

My issues: because it was such an ‘organic’ knit, it’s a bit loose in some areas and a bit tight in others. It sort of works out, but I’ve found myself tugging at the bottom edge and re-tying the ties every once in a while to keep it below-bust.

knits062
I’ve kept pattern notes this time, so I hope I can accurately tell you knitgentry (for this I shall title you) how it grew and how to make it grow for other sizes.

knits079

Hew
By CanarySanctuary
http://canaryknits.blogspot.com

Size:
Bust 34 (36, 38, 40, 42, 46, 48, 50, 52, 54)

Materials:
Manos Silk 2 (3, 3, 3, 4, 4, 4, 4, 5, 5)
4 mm circs (16” or longer)

Gauge:
5.5 sts / 1” on 4 mm needles

Pattern Notes:
Garter Rib: RS – K1, P1 to end
WS – P all stitches

This garment is constructed as a top-down raglan, with minimal seaming.

**Note: please be understanding. This is the first pattern I’ve attempted to size!

Pattern:
Cast on 96 (102, 114, 128, 132, 146, 150, 168, 168, 182, 182) sts.
Knit across 6 (6, 8, 10, 12, 12, 14, 16, 16, 18, 18) place stitch marker, knit in garter rib 12 (12, 16, 18, 18, 22, 22, 26, 26, 28, 28) place marker, knit 60 (66, 66, 72, 72, 78, 78, 84, 84, 90, 90) place marker, knit in garter rib 12 (12, 16, 18, 18, 22, 22, 26, 28, 28) place marker.
Arms are now marked for raglan increases.

From now on, do raglan increases in the manner written below until stitches for back number 82 (88, 90, 94, 96, 98, 98, 100, 100):

Raglan increases:
Knit across 6 (6, 8, 10, 12, 12, 14, 16, 16, 18, 18), slip the marker, increase 1, knit ribbing across arm stitches until one stitch before marker, increase 1, slip the marker, increase 1, knit across back stitches until 1 stitch before marker, increase 1, slip the marker, increase 1, knit ribbing across arm until one stitch before marker, increase 1, slip the marker, knit to the end.

When you have the number of stitches for the back, continue increasing for the arms (but not for the back!) until they fit comfortably around your upper arm.

When the arms fit around your upper arm:
Knit along front 6 (6, 8, 10, 12, 12, 14, 16, 16, 18, 18), slip the marker, cast off all arm stitches, take off second marker, knit across back, slip marker, cast off all arm stitches, take off second marker, knit until the end.

Increasing for bust:
Right Side Rows: Knit 1, increase 1, knit across all stitches until 2 stitches from the end, increase 1, knit 1.
Wrong Side Rows: Purl.
Work in this manner until number of stitches for front are 22 (22, 32, 32, 44, 44, 56, 56, 66, 66, 78).

***KEEP TRYING ON THE GARMENT to see how far it’s coming down your bust.
When you put the shrug on and it comes down 1 inch below your bust, begin the ties.

Ties:
With the RS facing, cast on 200 (206, 212, 224, 224, 230, 236, 247, 247, 260, 260).
Work garter rib across to end. Cast on 100 (103, 106, 112, 112, 115, 118, 121, 121, 124, 124).
From this point on, work garter rib, decreasing one stitch at the end of every row.
When the ties are 1 (1, 1, 1.5, 1.5, 1.5, 2, 2, 2, 2) inches wide, cast off all stitches.

Neckline:
Work entire neckline in garter rib.
Pick up 20 (20, 26, 26, 32, 32, 38, 38, 44, 44) along top of left tie.
Each RS row, pick up one stitch from edge of neckline and knit it together with first stitch of garter rib.
Work in this manner all the way around the edge of the neckline until you get to the right tie.
Finish off by grafting/Kitchener stitching the garter rib neckline to the top of the right tie.

Hew; or, what I did in Toronto

Le Lapin Noir

This is a throwback to a post published on March 16, 2008.

Hop hop.

on Ravelry

bata008

Pattern: Le Lapin Noir
Yarn: a whack of angora I bought many ages ago from Cottage Craft Angora

Why I love this one:
and oh, how I do!
Despite numerous mistakes (and I’ve learned to live with the multitude of errors I incorporate into each and every knit!) I love the fit, I like the shape, and it’s successfully fulfilled a search I have been undertaking to find the perfect argyle sweater for nigh on 2 years now.

knits084

Unless you’re looking for one, you probably wouldn’t realize that practically every bloody argyle sweater in stores has a v neck. I wanted a scoop neck.

Also, I’m fairly picky when it comes to the colours I wear. Though, I will hazard anyone interested in knitting a very small-gauge sweater in black: not so good for maintaining good vision.

knits101

I would have made 3/4 length sleeves (as is my way) but I ran out of black yarn. I think the short sleeves work alright, and are less incongruous than one would imagine on an angora sweater.

The yarn is amazingly dreamily soft. Just as soft (dare I say?) as the bellies of canaries. Highly recommended. Knit yourself an angora sweater.

knits092

This sweater was inspired by retro patterns and the angora yarn itself. I’d never worked with it before, and wanted to see how it behaved.
I’ve worn it a few times, and have found it to be sturdier than I would have imagined. I feared it would stretch to frightening proportions as soon as I was moving around in it. This didn’t happen at all.
I also feared it would pill horribly. This also hasn’t happened (yet).
As I understand angora is (one of the) warmest fibres one can wrap around a body, I feared it might overheat me. I had no such problems.
As you can see, it creates a beautiful halo of bunny-goodness all around you.
knits098
I didn’t block it (shock and horror!). I wasn’t sure how it would take to the water. I’m entirely pleased with the intarsia, though, and I don’t know that it would benefit from a blocking anyhow.

***************

Le Lapin Noir
by
CanarySanctuary
http://canaryknits.blogspot.com
Spurred on by my inability to find a good argyle sweater, Le Lapin Noir was created with retro sweater-girl inspiration.
To make it a suitable warmer-weather knit, a light sock yarn could be substituted.Needles:
2.5 mm straights
2.25 mm circs (at least 18” long)

Yarn:
Cottage Craft Angora 100% angora yarn
Approx. 90 metres/hank (discontinued)
http://www.cottagecraftangora.com/
Black 8 (9, 10, 12, 14, 16, 18) hanks
Pink 1 (2, 2, 3, 3, 4, 4) hanks
White 1 (1, 1, 1, 2, 2, 2) hanks

Gauge:
8 sts/ inch
10 rows/ inch

Sizes:
XS: 28”-30”
S: 32”-34”
M:36”-38”
L: 40”-42”
XL: 44”-46”
XXL: 48”-50”
XXXL: 52”-54”

Front

Using long-tail method and 2.5mm needles, cast on 92 (108, 124, 144, 160, 184, 200) sts.
Knit in 1×1 ribbing for 4 (4, 5, 5, 5, 6, 6) inches.
Decrease row: You will be decreasing 2 sts each side every time you do a decrease row.
K1, P2tog, K2tog, knit in rib across sts until 5 before the end of the row. Then Kl, P2tog, K2tog, P1.
*Continuing in rib, knit another 1 (1, 0.5, 0.5, 0.5, 0.75, 0.5) inches.
Work another decrease row as stated above.
Repeat from * 1 (1, 1, 3, 3, 4, 2) more times.
At this point you should have 80 (96, 112, 124, 140, 164, 184) sts.
Knit in rib until you have 6 (6, 7, 7, 7, 8, 8) inches from the cast on edge.
Stop working rib, and begin working the intarsia chart.
Begin at number 1 (1, 1, 10, 10, 14, 13) listed at bottom of intarsia chart. This will centre your argyle on the sweater.
Work the chart for 1 (1, 2, 2, 2, 2, 2) inches.
Increase row: You will be increasing 1 st each side every time you do an increase row.
(Work argyle pattern in to increases).
K1, increase 1, work across row until 2 sts before end, increase 1, knit last st.
*Work another 0.5 inches.
Work increase row.
Repeat from * 4 (1, 4, 8, 8, 8, 6) more times.
You should have 96 (102, 124, 144, 160, 184, 200) sts.
Now you will continue knitting the intarsia until piece measures 13 (13.5, 15.5, 15.5, 15.5, 16.5, 16.5) inches from the cast on edge.
Work across 27 (32, 42, 50, 56, 66, 74) sts, put middle 38 (38, 40, 44, 48, 52, 52) sts on a stitch holder, work across the remaining 27 (32, 42, 50, 56, 66, 74) sts.
Work 2 rows
Cast off for armholes: (please read ahead – you’ll be shaping the neck at the same time!)
Cast off 6 (6, 8, 8, 10, 12, 14) sts on each side of next 2 rows.
Decrease 1 st each side every RS row 4 (4, 6, 8, 8, 8, 8) times.
Neck Shaping: AT SAME TIME AS ARMHOLE SHAPING
Decrease 1 st each side of neck every RS row 12 times.
Work until arm holes measure 7 (7, 8.5, 9, 9.5, 10, 10.5) inches.
Put sts on holders.

Back

Work the back in the same manner as the front (excluding the intarsia chart) until neckline.
When piece measures 14.5 (14.5, 16.5, 16.5, 16.5, 17.5, 17.5) inches, put centre 38 (38, 40, 44, 48, 52, 52) sts on a stitch holder, and work the neckline the same as for the front.
Sew front and back together along sides, and graft/Kitchener stitch tops of front and back together.

Neckline

Using 2.25 mm circular needles, pick up stitches along neckline, including the ones you’ve placed on stitch holders.
Work in a 1×1 rib for 1.5 (1.5, 1.5, 1.5, 2, 2, 2) inches.
Cast off (be careful: don’t cast off loosely!)

Arms

Cast on 76 (76, 88, 96, 108, 116, 128) sts.
Work 1×1 rib for 1 (1, 1.5, 1.5, 2, 2, 2.5) inches.
Begin Sleeve Cap:
Cast off 8 (8, 9, 10, 12, 12, 14) sts at the beginning of next 2 rows.
Knit in rib for 4 rows.
Decrease 1 st each side every other row 5 (5, 7, 9, 10, 14, 15) times.
Decrease 1 st each side every 4th row 10 (10, 10, 10, 10, 10, 10) times.
When sleeve cap measures 5.5 (5.5, 6, 7, 7.5, 8, 8.5) inches, decrease 1 st each side every row 5 (5, 7, 7, 10, 8, 9) times.
When sleeve cap is 6 (6, 6.5, 7.5, 8.5, 9, 9.5) inches from cast on edge, decrease 2 sts each side every other row 5 (5, 5, 5, 5, 5, 6) times.
When sleeve cap is 7 (7, 8.5, 9, 9.5, 10, 10.5) inches long, cast off.

Finishing

Sew sleeves onto body.
Weave in all ends.
Blocking the finished garment is optional (the original, knit in angora, was not blocked).

Tips

Intarsia can easily become a hassle of tangled ends. In order to keep sane, I wound and then cut off a few feet of each colour-section. This certainly did add to the number of ends I had to weave in come finishing time, but was slightly more manageable than large balls of yarn emanating from my work.

Think twice before you use black! (If only to maintain decent eyesight). You can’t imagine how frustrating it is to try and neatly sew up black knitted garments with tiny gauges!

Intarsia Chart
chart001
Garment Schematic
lapindiagram

Le Lapin Noir

Alatus

This is a throwback to a post published on September 19, 2007.

Alatus: Winged
DOWNLOAD NOW

On Ravelry

I must admit that Latin is not a strong point, but when I was thinking of what creative name I could come up with for this knit, I took the easy way out and simply described the item in another language. (sneaky creativity)
alatus022
From the front, and unassuming (if extremely low-cut) sweater.

alatus024
And from the back, my experiment with cable-mapping.

alatus037
And un-modeled, depicting the truer-to-life chocolate brown loveliness that is Louisa Harding’s yarn.

Specs:

Pattern: Alatus (self designed exploration of cable mapping)
Yarn: Grace by Louisa Harding (6 skeins)
Things I’d change: As usual, there are several. First, I’d add some more space to the front-sides around the neckline. I’d also curve the neckline a bit more too. It came out more square than I had envisioned. I’d be more careful about shaping the sleeve cap (since I had to pull them both out several times to achieve a normal-appearing shape). The sleeve-holes would be about an inch longer too. It’s not tight there, but there certainly could be more room. I’d also be more meticulous in my counting for the pattern. Unfortunately, up near the arm shaping, I ran out of room and had to sacrifice a feather or two.

What I love about it: mostly the yarn. It’s like butter. Oh so wonderful, and the most perfect shade of chocolate brown I’ve ever seen in a yarn. Highly recommended.
Three-quarter sleeve rock the boat. You save yarn, it still keeps you warm, and yet you don’t have to worry about the cuffs getting worn or crappy. It also saves time on the much-dreaded sleeve knitting.

This knit depends on another (as yet unfinished) knit for a large part of it’s prettiness. I’ll photo them together when/if I can get it completed before October 1. (mais oui, self-imposed deadlines once again).

I’ve been playing with the idea of posting the cable chart, but I think it’s only discernible by me.

Come on cold weather! I can’t wait to wear this puppy!

***Link to Pattern on Craftster***

CHARTS

Picture2Picture1

Alatus