Our last post where we looked at your personal variety of modifications.
The #KnitPetiteProject plan.
All other #KnitPetiteProject posts.
The #KnitPetiteProject now has a Ravelry group. Join us!
In June, we’re focusing on tactics to petite your knits, always keeping in mind:
- comparing petite measurements to “regular” CYC charts
- “diagnosing” fit issues (posts in May)
- deciding how we feel about fit (post from June 6)
- determining tools to alter fit to our liking
- learning to identify patterns that work for our taste and/or are easily modifiable
- and very importantly, considering how we differ from a general sizing chart so we have a set of general rules to consider before we begin knitting a pattern1
This week begins our learning exercise with a particular pattern. I’ve selected Winter Doldrums from Knitty to act as my example; I suggest that you follow along with your own selected pattern, and talk about it in the #KnitPetiteProject Ravelry group here.
A valuable resource that outlines in a general way the way you can approach a pattern to ensure you get a fit you want is this post from Knitty, Knit Smarter, not Faster. While not required reading for the #KPP, I think it’s pretty great and has useful pointers for approaching any sweater knitting project.
Hallmarks of a Design you can Modify
At this point in the #KnitPetiteProject we’ve talked a bit about assessing our own needs and desires for the fit of our garments. Now, we’re going to look at how to achieve those needs and desires within a particular pattern.
I’ve selected Winter Doldrums for a few reasons: I know that Knitty follows the CYC standards within their designs, it’s a pattern that is freely accessible to everyone so you can follow along with this exercise, and it’s a design that present a relatively complex and common issue that petite knitters encounter (shortening a yoke depth and having to interrupt a colourwork chart).
To approach this exercise, and every other pattern you want to petite for yourself, you can follow these steps:
- have a knowledge of your own shape and how it differs from the most common sizing standards (CYC and Ysolda are widely used)
- assess the pattern and see how it aligns with your own fit preferences
- make sure your stitch AND row gauge are the same as the pattern; if they differ, you may still be able to work with the pattern, but you need to take this into account
- READ THROUGH THE WHOLE PATTERN!
And now, check the pattern for the following:
- pattern notes: do they include information about selecting a size (ie: suggested ease?)
- pattern photograph: are the model’s measurements and the finished knit size given?
- listed sizes: make sure you are clear on what the numbers actually represent. MOST patterns are supposed to give you the measurements of the finished garment, NOT the measurements of your body. This is a significant difference!!
- is there any information about the sizing chart used by the designer?
- garment schematic: what measurements are included?
- how is length addressed within the pattern (ie: is it “knit in pattern for 5”, OR, is it “knit in pattern for 20 rows”)?
- details about the construction of the sweater (bottom up? set in sleeves? seamless?)
- make note of design elements within the sweater (cables? textured stitches? colourwork? lace?)
Suggested Ease
This is important to check for because ease makes a significant difference to the look and feel of the sweater. In some cases you may want to alter this, but if you selected the design because you liked the way it looked on the model, then double-checking the suggested ease against your own body and the information in the pattern is an important step in ensuring you’ll have the size of garment you want.
EXAMPLE: Winter Doldrums says, “shown in size L, worn with 1.5 inches of positive ease”.
Pattern Photograph
This information is tied to the suggested ease; sometimes it’s explicitly stated by putting together various bits of information within the pattern, ie: the model’s bust is 42″, and she is wearing size XL, and size XL has a finished bust of 45″, therefore 3″ of positive ease is suggested. Sometimes it’s more like what we have, which I included above, “shown in size L, worn with 1.5 inches of positive ease”. This is helpful, but I am making the assumption that the model’s bust measurements align with what the CYC says a size L is.
Listed Sizes
While it’s almost always industry standard to list the size of the finished garment and NOT the body it’s meant to fit, this is easily confused and sometimes you may encounter patterns where this is not the case. So, it’s always good to check.
EXAMPLE: I know that Winter Doldrums’s listed sizes are intended to be the finished garment because 1) it lists them as “Finished Measurements”, and 2) the garment schematic shares the same numbers as the listed sizes.
If you’re still unsure, you can do a bit of extra work and look at the number of stitches you’ll have at the bust, waist, or hips, and using the gauge, divide that number up and see if it aligns with the schematic. This isn’t always easy; you may have some unusual construction, or a design element that obfuscates that number in some way. But, in our example for this week, I can confirm the numbers this way:
EXAMPLE: Winter Doldrums has an easily-found list within the pattern itself of the number of stitches you have at the waist. For the size I’m looking at (35.5″), I see that the waist has 140 sts. The stitch gauge is 4.5/1″. So, I divide 140 / 4.5 = 31.1″. I can then look at the garment schematic and see that it indeed also lists 31″ as the waist circumference.
Sizing Chart
This is can be obscure information. Most of the patterns I’ve seen aren’t explicit about what sizing charts they use. If this is not listed on the pattern, sometimes it may be listed within the source material ie, if it’s from a magazine, then the magazine may have a general statement about what they use. This information may be tucked away in information for designers, that is, submission guidelines.
EXAMPLE: Winter Doldrums doesn’t list this anywhere on the pattern, but within Knitty’s pattern submission guidelines, it states in bright pink text at the top of the text: “Knitty requires all patterns to follow CYC sizing standards. Charts and full information can be found on this page.” And they link you right to the CYC website.
Garment Schematic
The more numbers, the better! Knitty can sometimes have only a handful of different measurements for a sweater, but it can also have many measurements listed.
This information is very useful to you as a petite knitter because it’s going to give you the most power to modify; it’s going to explicitly show you what the designer was going for, especially in the vertical measurements. Remember: as much as it’s annoying and sometimes difficult, knowing your row gauge and getting it as close to what the pattern wants is significantly tied to your vertical measurements!
EXAMPLE: Winter Doldrums gives me the neck, bust, waist, and upper arm circumference, and the yoke depth, sleeve length, and body length.
Significant to this sweater construction is that yoke depth. We’ll talk a bit more about that below in Sweater Constructions.
How is Length Addressed in the Pattern?
Opinion is divided within the designer world on this point.2 Some believe you should always list the number of rows to be worked, where others believe you should just give the length that needs to be knit. That is, are you instructed to knit for 5″, or are you instructed to knit for 25 rows?
You find this point on this list because I think it’s important to draw you attention to it: you may have a personal preference, and being presented with the opposite might pose a problem, or at least an extra step, in your modifications.
EXAMPLE: Winter Doldrums states how many rounds you must knit, rather than how many inches. This means that when I’m reworking the lengths (particularly the yoke), I have to go through the pattern and note how the length progresses throughout the yoke, and how it lines up with the shaping and colourwork that happens at the same time.
The Construction of the Sweater
There’s myriad reasons why this is important, from personal preference to ease of modification. But at the very least, knowing the construction of the sweater means that it’s easier for you to read and understand as you examine it for all the previously-listed hallmarks. You should also try to assess shaping; that is, if there is any shaping, and how the shaping is achieved. Sometimes it’s through changes in gauge, but most often you’re likely to encounter stitch increases or decreases at the side seams, it can also be one quick succession of increases/decreases in one row, or spread out across the front or back of the sweater, etc…
EXAMPLE: In Winter Doldrums, the pattern introduction says the design includes “waist shaping, fitted sleeves, a loose cowl neck”. It doesn’t explicitly say that it’s bottom-up and seamless, but I can see that that is the case by reading through the pattern. Skimming down through the pattern, I can also see that the waist is shaped in from the hips evenly at the side seams over about 4″ of length. For petites, this is particularly important! Please do not overlook this sort of information!
Types of Sweater Design
Sometimes you can’t help what sweater you fall in love with! Here is a quick and handy list of different sweater constructions3, and what you should look out for when considering each for your petite modifications. Nothing is impossible to overcome with work, math, and dedication. But, some may be easier than others.
This list is only for the construction of the sweater; any sweater can have complicating factors such as stitch patterns and colourwork. When appropriate, notes on those points will be included.
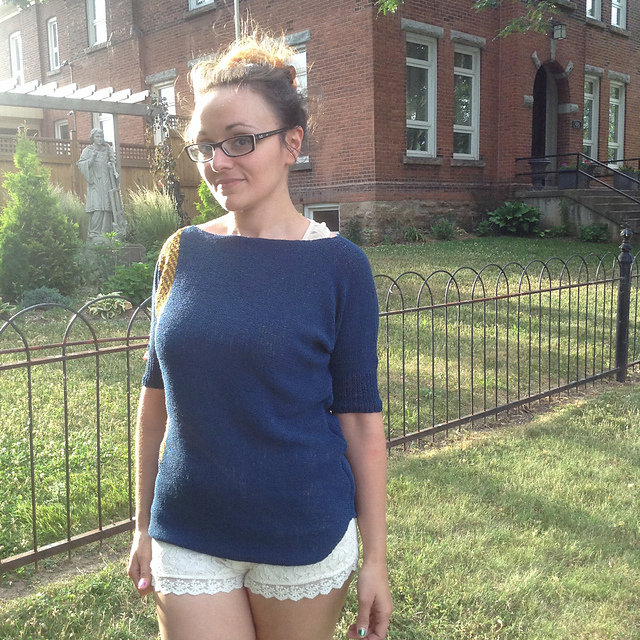
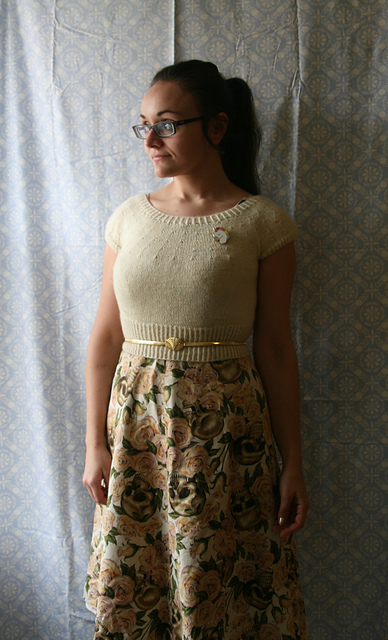
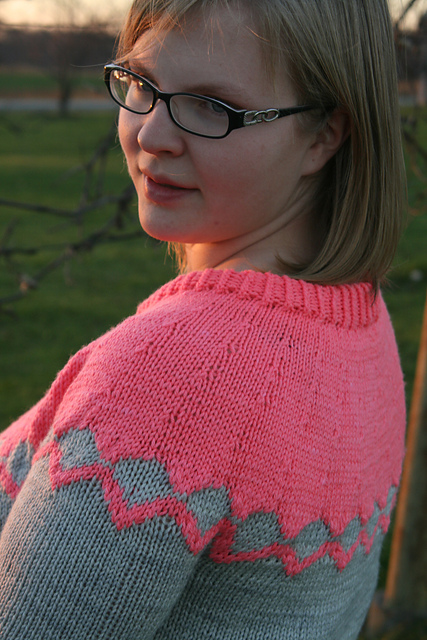
I’ve included images of some of my own designs to illustrate these sweater constructions.
Direction of Knitting
Top Down: quite popular in recent years, particularly with seamless designs. Top down sweaters mean you get to deal with the shoulders first, and as we’ve noted in the #KPP, fitting the shoulders is crucial. You also get to try it on as you go, which is reassuring (particularly when you’re first entering in the uncharted waters of petiting for yourself). You’ll find top down sweaters in raglans, contiguous constructions, and yoked sweaters, among others.
Bottom Up: a classic style, bottom up is often found in vintage patterns, and is favoured by many knitters (particularly when paired with a seamed design, because it allows for extra structure within those seams). You’ll find bottom up sweaters in set-in sleeve garments, yoked sweaters, and drop shoulders, among others.
Side-to-Side: usually (but not always), these sweaters are oversized and/or have less waist/bust shaping than other sweaters. For petite knitters, these pose a different kind of modification challenge, though not necessarily a more difficult one. Side-to-side sweaters mean that your vertical measurements are now measured through stitch gauge, not row gauge. You’ll find side-to-side sweaters mainly in oversized, drop shoulder type of designs.
Other: there’s SO many ways you can create a sweater! And sometimes the more radical the look, the more tricky to modify (though not impossible!) An example is a modular sweater; something that might be knit from the centre-out, or perhaps made up of many different hexagons that are sewn together. Your petiting-challenge would be tricky, but not impossible!
Shoulders
Read more about sleeves and shoulders in detail here on Knitty, Thinking Beyond the Pattern, Ravellings on the knitted sleeve part 1, part 2, and part 3.
Drop Shoulder

This is a very simple sweater construction. It creates sleeves that stick out at right angles from the body of the sweater. Because of this, it means you get excess fabric at the armpit, and (if sleeves are seamed in), a shoulder seam that sits closer to your bicep than your shoulder. These tend to be oversized sweaters; think the big knits of the 80s.
Look for this construction if:
- you like positive ease/oversized knits
- you’d like a gentle and relatively simple introduction to petiting your knits (you can easily make shoulders narrower and/or shallower, you can simply reduce length)
Think twice about this construction if:
- a very fitted style is important to you
Raglan
Usually a top-down construction, raglans are often suggested to new knitters as a good first sweater because of that try-it-on as you go option. Raglans make room for your shoulders by creating a set of stacked, slanted lines of increases from the neckline down to the armpit.

Look for this construction if:
- you have shoulders that align with the length, breadth, and depth the pattern assumes. This means you have an easily memorized increase pattern for your sweater that will be easy to try on as you go.
Think twice about this construction if:
- you have narrow or sloping shoulders (raglans can sometimes assume a lot more shoulder than you have, thus you’ll end up with way too much fabric pooling around your armpits)
- you have a shorter vertical measurement in your sleeve cap depth than the pattern assumes (a raglan relies on a certain length of sleeve cap in order to get from the neckline circumference to the circumference at the splitting of the sleeves from the body. If you need to change this, it means those already-rapid increases will have to be even more rapid, and that might create sharp points that juts out in your raglan sleeves)
Yoked
These sweaters spread the shaping for the upper chest and shoulders out across that whole area. Depending on the direction of the knitting, the increases or decreases are very smooth and dot across the chest, back, and shoulders. These sweaters are often seen in beautiful colourwork designs, and are very popular because of this and the fact that, when knit top down, they are also a try-on-as-you-go sweater like the raglan listed above.
Look for this construction if:
- your petite needs may be on the lower half of your body, OR
- you’re not afraid of the possibility of a lot of math! OR
- the yoked sweater does not have a complex stitch pattern across the yoke (this is unusual to find, but not impossible)
Think twice about this construction if:
- you want to avoid complexity in math and design detail alterations. That beauty in a colourwork yoke relies on a rigid amount of assumed length in your yoke depth; this means that any length you want to remove from that area (important to petite people who often encounter this vertical length issue) will be complex, and you may have to chop off some of the design, or alter it significantly to make it flow. This is complicated further if you also want to narrow the shoulders.
- the example I’m using for this exercise, Winter Doldrums, is a bottom-up colourwork yoked sweater.
Set-in Sleeves

These types of sweaters are often paired with a bottom-up construction and are usually knit flat in pieces, and seamed (front to back, arms to body, and sometimes the entire length of the arm itself). Amy Herzog is a big fan of the seamed, set-in sleeve sweater; her Knit to Flatter class and CustomFit software have been mentioned a lot in the #KPP because these resources are focused on getting you a fit that works with YOUR body. Herzog likes this construction because the seams provide stability, it’s the easiest to modify (IF you’re working with a base size, which many petites may not be) and because it’s in pieces, it forces you to have a plan for everything before you start. It also allows for less to rip out if you make a mistake (ie: your bust darts didn’t work out? You only have to rip out the front of the sweater, not the back and the arms too!)
Look for this construction if:
- you want to focus on the structure of a fitted sweater that will teach you a “classic” form of fit (ie: the seams will sit on your body in very specific places).
Think twice about this construction if:
- you need to see the progress of your petiting mods and want to try it on as you go
- you want to first practice and understand the way your petite mods work with “standard” sweater sizing charts; as Herzog notes, this construction forces you to have a plan for everything before you get started!
Saddle Shoulder
This construction is a bit of a hybrid between a set-in sleeve and a raglan. It creates a straight line that runs along the top of your shoulder, allowing a design element (like a cable) to run all the way up from the sleeve cuff to the neckline, while maintaining a sleeve cap fit that is closer to the body. You can see an outline of it here on Carol Feller’s blog, Stolen Stitches.
Look for this construction if:
- you want the option of top down or bottom up; you can make this sweater either way (and like the others, the top down version means you can try it on as you go)
Think twice about this construction if:
- the length of your shoulder doesn’t align with the design as-is; some sources note that this style may lead to baggy underarms.
Contiguous
This is a fun method of knitting the sleeve caps and shoulder seams from the top down.4 It’s become popular lately because of how much people enjoy top down sweaters. Contiguous sweaters allow for neat design elements that might not be as simple or possible to create if working with a different top-down construction. It also creates a gentle slope to the shoulder in a way that (I would argue) is simpler than, say, a seamed, set-in sleeve sweater would.
Look for this construction if:
- you’re ok playing around a bit with the shoulder shaping: keep in mind that those shoulders are the first thing you’re doing, so frogging back means losing less time, and it allows you the ability to try-it-on as you go.
Think twice about this construction if:
- you haven’t tried it before; but don’t be afraid! As Susie Myers herself suggests on her free pdf download, “a good way to get a feel for this method is to try the Mini-Sampler KAL“. Creating the mini-sample means you can picture this construction, and moving forward with modifications will be an approachable task.
Complicating Factors: Stitch Patterns and Design Elements
The simplest sweater for you to select for practicing your petite modifications would be something in plain old stockinette, with perhaps some ribbing along the cuffs and edges. But let’s be real: most of us knitters like the fancy stuff in our FOs! Stitch patterns and other design elements are likely a big part of what attract us to a particular sweater.
But, those aspects need to be considered when we’re looking for hallmarks of a sweater pattern we can modify. Pattern elements that take place over a large number of stitches and/or rows are going to make your modification more difficult (depending, of course, on what/how many mods you need to make). Here’s a short list of some of the things to look out for and make sure you consider when selecting a pattern to petite.
Cables
- are they all-over cables?
- how long is the cable (or cables!) repeats? how easy will it be to shorten them? will they look unattractive if you chop them off in a particular place?
- what’s the stitch gauge in the cable pattern? (cables pull stitch gauge inwards)
- how many cable repeats would you have to add or remove to get the width you want? Does this throw any balance in the pattern off? (ie: an uneven number of cables?)
- do you need to create something like bust darts? If so, are the cables in the way? Can you work around them?
Lace

- the number of stitches within a lace repeat can sometimes change within that repeat: where do you have to cut off the lace? Will there be too many (or too few?) stitches at that point?
- bust dart considerations (as outlines under CABLES)
- how long is the lace repeat? how easy will it be to shorten? will it look unattractive if you chop it off in a particular place?
- how many lace repeats would you have to add or remove to get the width you want? Does this throw off any balance in the pattern?
Textured Stitches
- these can be complex, and occur over many rows to complete a repeat, but they can also be very small. Either way, you have similar concerns with textured stitches as with the lace and cables listed above.
- a relatively simple example is ribbing; even a 2×2 ribbing takes up repeats of 4 sts, and depending on the design, that might be 4+2 sts, or 1+4+1 sts. It can be chopped up in a number of ways to fit into the aesthetic and function of the design to consider things like selvedge seams, or split edges, or other finishing details like i-cord edges, lace trim, etc…
Colourwork
- colourwork is often very graphic; it “paints a picture”; will you have to chop off this picture to shorten parts of your sweater? This is the case with both stranded and intarsia designs.
- in a yoked sweater, you have to increase in both width and length as you’re working from the top down; the designer has very carefully inserted increases within and between the colourwork. How will you account for this in your petite modification mathematics?
- EXAMPLE: In Winter Doldrums, I’m presented with a beautiful colourwork yoke that, according to the size I would like to create, is about 1.5″ too long for my preference. What do I do? We’ll look at the particulars of that in an upcoming post this month.
NEXT WEEK: Our topic is “Are there general modification rules we can follow when looking at a pattern we want to modify to our personal petite-ness?” Keep that pattern you selected in hand because we’re going to be looking at it again til July!
Question
How does YOUR selected pattern score on this list of hallmarks? Share about it in the #KnitPetiteProject thread here!
Resources
- Knitty. Submission Guidelines. Accessed June 12, 2017.
- Carla Pletzer. Winter Doldrums. Knitty, Winter 2014. Accessed June 12, 2017.
- Karen Templer. Fringe Association. Pullovers for First-Timers; Or, an Inftroducation to Sweater Construction. November 21, 2013. Accessed June 12, 2017.
- Craft Yarn Council. Standard Body Measurements/Sizing. Accessed June 12, 2017.
- Ashley Little. Craftsy. 10 Ways to Knit a Sweater + the Skills you need to Knit Them. November 8, 2014. Accessed June 12, 2017.
- Jenna Wilson. Knitty. Thinking Beyond the Pattern: Knit Smarter, Not Faster. 2004. Accessed June 12, 2017.
- Carol Feller. Stolen Stitches. Seamless Saddle Shoulder Construction. January 27, 2017. Accessed June 12, 2017.
- Susie Myers. Ravelry. Contiguous Sweater Construction Method. Accessed June 12, 2017.
- Jenna Wilson. Knitty. Thinking Beyond the Pattern: Ravellings on the Knitted Sleeve Part 1, Part 2, and Part 3. Accessed June 12, 2017.
- Elizabeth Zimmermann. Knitting Without Tears. Simon & Schuster, 1995.
1 Amy Herzog refers to this as well in her excellent Craftsy class, Knit to Flatter. She clarifies and defines “Miss Average”, and states that while you will differ from Miss Average, you’ll “always differ in the same way”, so getting your numbers is a big and important first step.
2 Many contemporary patterns will give you the length in rows/rounds. Elizabeth Zimmermann, writing in Knitting Without Tears (1971), states, “Some directions give you the vertical row gauge as well as the horizontal stitch gauge. I have yet to find a good use for a vertical row gauge, since vertical measurements are much easier to handle in inches.” pg 49.
3 This list is taken from Fringe Association in this very helpful and interesting post, as well as this post from this Craftsy on sweater constructions.
4 The Contiguous method as outlined here was created by Susie Myers. You can read about it here.
