Get out those sweater patterns again, because it’s week 3 of our very practical look at modifying for our personal petite-ness!
In June, we’re focusing on tactics to petite your knits, always keeping in mind:
comparing petite measurements to “regular” CYC charts
“diagnosing” fit issues (posts in May)
deciding how we feel about fit (post from June 6)
determining tools to alter fit to our liking
learning to identify patterns that work for our taste and/or are easily modifiable
and very importantly, considering how we differ from a general sizing chart so we have a set of general rules to consider before we begin knitting a pattern1
I’ve selected Winter Doldrums from Knitty to act as my example for this set of practical posts; I suggest that you follow along with your own selected pattern, and talk about it in the #KnitPetiteProject Ravelry group here
Math, (im)modifiable design features, and your personal taste
Everyone should be able to wear whatever their heart desires regardless of what “rules” might say. I don’t want oppressive social ideals to dictate what we do or don’t create and wrap around our bodies.
YOU decide what to wear and the limits of your interest, energy, style, talents, and circumstances.
So, where do petite fitting modifications come in?
Math
I made a case for the importance of math and swatching last week, and I’m going to lean even more heavily on it this week. Please understand that I do NOT love math, and problem-solving those numbers takes me longer than it does for (probably) most other people. But math is foundational to getting you the results you want when modifying patterns, whether that design is super simple or pretty complex.
What follows below is a bit of math that I would choose to do in modifying the design Winter Doldrums to my personal petite-ness.
Mods I want to consider
shorten yoke depth by about 1.5″ to accommodate for my shorter arm depth measurement
narrow the yoke area to create a closer fit in the upper back and shoulders
take some ease out of the waist area (simply for my personal, stylistic tastes)
Petite-ing Tactics
My bust is 35″, and I picked size 32″ based on that measurement; I’m happy with 32″ because I like a more snug fit, and picking 32 brings the size closer to my “frame” measurement of 31″ (at my upper torso. Remember, that’s one of the tips to getting something to fit your frame/shoulders).
Even though this pattern is knit from the bottom up, I’ll start my math mods at the yoke. I’m starting here because the yoke is where most of the changes need to happen, and it’s where those changes will get tricky because of the alterations I’ll have to make to the colourwork.
I want to see how big around the sweater will be at that upper torso measurement; looking though, I see that there’s 80 sts at the top of the bust shaping, which works out to 32″ in the 4.5 sts and 6 rows/1″ gauge. Lovely! I can proceed with that part as is.
When I add in the sleeves for the upper arms, that’s 144 sts, which works out to 14 repeats of the colourwork chart.
Where this gets a bit tricky is in the shortening of the yoke. The beautiful colourwork will have to change to accommodate my removal of about 1.5″ of armhole depth. That works out to about 9 rounds. But, how to do this?
I can see about 5 rounds that I can try to eliminate; 2 of these 5 rows are in the solid MC area with no shaping, so that’s easy. The other 3 rounds would have to chop off some of the colourwork. This is where a swatch comes in handy!
As you’ve noticed, however, I still have 4 extra rounds in the sweater to remove! I suppose I could also choose to remove an entire section of colourwork entirely, but that also significantly changes the look of the sweater.
Alternatively, I could try a smaller gauge, but that would involve an incredible amount of reverse engineering for this sweater – really, it would be re-designing the whole thing!
So, let’s assume that I remove one of the colourwork sections entirely, and have achieved my yoke goals with the gauge as-is.
How about that waist measurement and placement?
Here, some issues of taste come in: if I’m keeping the bust at about 3″ of negative ease, it might look more cohesive if I did something similar to the waist (plus, I prefer negative ease in a sweater anyhow).
So removing 3″ means removing an extra 13 (or so) stitches. Simple enough in theory, as this is the main colour section and I just have to evenly space those decreases throughout the already-established set of 5 decrease rounds which each remove 4 stitches (so, it would be advisable to make that a decrease of 12 stitches instead of 13, since 12 divides very neatly by 4). Voila!
Or is it voila?
Another consideration that many petite folks need to make is where that waist is being placed. Do I have to move it up?
All signs point to yes: I already know that this design used the CYC sizing charts, and those charts put the back waist length at a full 2″ longer than my own measurement. I can confirm this by looking at the length from the hips to the waist; the pattern asks me to knit to 7″, then work 20 rounds (that is, 3″) of decreases to the waist. That puts the waist at 10″ in from the bottom hem. Double checking from the schematic, I see that the body to the armpits is 17″, and measuring on my own body puts that length at just below my bum. A bit longer than I’d like!
So ultimately there’s evidence that shows I should take 2″ of length out of the body. It’s a good thing that Winter Doldrums has a relatively detailed schematic! Remember: that diagram is a very good tool for guiding your modifications!
Where to take out those 2″ of body length? In our gauge that works out to 12 rounds, which over those 17″ of length (which is 102 rounds) is pretty easy to sprinkle evenly throughout (every 8 rounds or so).
I want it to be evenly spread because removing it all from the bottom will send me into the waist decreases too soon, and possibly give a bit of a pointy look to the bottom of the sweater. This works for me because while I have a shorter waist than patterns and clothing assume that I do, I’m pretty proportional. Always follow the rules your body dictates, because your body rules!
(Im)modifiable design features
Nothing is im-modifiable. But, some things may require so much modification that they become unrecognizable as the same design, or you may consider them far too much time investment for your ultimate FO. Reverse-engineering a design may be too much work.
You saw from the example above that there’s quite a few decisions I had to make and re-working I had to do; I essentially have to re-engineer that lovely sweater using the detailed info it gave me, the knowledge I have about designing (ease, where to put it, ways to smoothly add/remove stitches), and the rules dictated by my own body shape and style preferences.
You’ll note that I didn’t even mention bust darts, though many people would prefer to have added them in. Fortunately for me, Winter Doldrums is a sweater that I could (relatively easily) experiment with as-I-go because all the frogging could happen before the intense colourwork.
The question for you is how you can negotiate all the variables of petite-ing a design, including your own interest, energy, knowledge, and time investment available to apply to the modification, as well as just how much it is you have to modify.
Formula:
your knowledge x (your desire for this FO)your assessment of what your body needs in the modification of the design
time
And all you mathematically inclined folks out there are laughing right now, because you know this formula looks very silly indeed. But you get my meaning, right? 😉
As you see, there isn’t a tidy answer to what is im-modifiable. It’s essentially up to how much work you want to put into reverse-engineering a design. But, we did go over hallmarks of a design that you can modify earlier this month, which includes notes regarding sweater construction and design elements and their “strengths” and “weaknesses” in regards to modification.
It’s significant to note that if you decide to jump into detailed reverse engineering (or modifying!) of a sweater, there’s a number of places you can go for help:
some LYSes can lend a hand, and may be able to give you private lessons or point you to a knitting teacher who you can hire for help
if you know what needs to be modified, but need help learning a technique, YouTube is a great place for videos (or if you learn better through reading the wonderful Principles of Knitting by June Hemmons Hiatt is incredibly thorough)
Ravelry is filled with forums and friendly folks who can help; you may be able to find help in the Techniques or Patterns board
and particularly, the #KnitPetiteProject Ravelry group. We’re here specifically to be a support community for petite folks and fit issues! Please join us!
If you have any takeaway from this post it’s this: petite mods can be quite complex. We can educate ourselves and learn all sort of tactics and apply all those modifications, but I think there is a strong argument to be made within the knitting world for petite patterns.
Question
Would you take an online course to learn more about gauge, knitting math, and reverse-engineering a sweater pattern?
1 Amy Herzog refers to this as well in her excellent Craftsy class, Knit to Flatter. She clarifies and defines “Miss Average”, and states that while you will differ from Miss Average, you’ll “always differ in the same way”, so getting your numbers is a big and important first step.
Get out those sweater patterns again, because it’s week 2 of our very practical look at modifying for our personal petite-ness!
In June, we’re focusing on tactics to petite your knits, always keeping in mind:
comparing petite measurements to “regular” CYC charts
“diagnosing” fit issues (posts in May)
deciding how we feel about fit (post from June 6)
determining tools to alter fit to our liking
learning to identify patterns that work for our taste and/or are easily modifiable
and very importantly, considering how we differ from a general sizing chart so we have a set of general rules to consider before we begin knitting a pattern1
I’ve selected Winter Doldrums from Knitty to act as my example for this set of practical posts; I suggest that you follow along with your own selected pattern, and talk about it in the #KnitPetiteProject Ravelry group here.
General Modification Rules
By now in the #KnitPetiteProject you should have a good idea of your body shape + size (using tools like a body graph, measuring our bodies, looking at sizing charts) and fit preferences.
As each of us (and each pattern we select) will be different and offer up so many variables, we have to be thoughtful about determining any general modification rules for our knitting patterns.
To arrive at this individual list of modification rules, you need to do the following:
have your accurate body measurements
compare your measurements to the major sizing charts used by knitting designers
understand (at least in a general way) different sweater constructions
check out what some general lists of petiteing tactics suggest
be willing to learn through doing!
Below, I’ll go over each of these steps using my selected pattern for this exercise, Winter Doldrums.
Accurate Body Measurements
We’ve gone over this a bit in the #KnitPetiteProject, particularly in February. Recently, we also discussed the value in creating a body graph.
I certainly understand the desire to have the internet hand you a perfect list of what you need to do each time you assess a sweater to knit (and I’ll give a small one below!), but I’ve noted accurate body measurements first on this list because a rundown of general rules for petites may actually set you on the wrong track and cause frustration if you aren’t already aware of your own body’s shapes and sizes.
Imagine if I had a broad back, but a short armscye depth. A “general rules for petites” might suggest something quite helpful in shortening my armscye, but would also tell me to narrow the back – that would cause some big time frogging when I realized it was super tight around my shoulders/upper back!
Comparing your Measurements to Major Sizing Charts used by Knitting Designers
This advice will give you a general sense of how your body is shaped vs. how many (but not all) patterns will assume it’s shaped.
Knitting designers use all sorts of different sizing charts; some develop their own unique charts, some purchase (relatively expensive) charts, and some use free and accessible charts that anyone can take a look at online.
If you know what chart the designer used, then that’s going to give you the most accurate info. But sometimes you just don’t have this information at hand. My suggestion is to take a peek at two of the most common (and freely accessible) charts that knitting designers use, and that we’ve talked about a lot here on the #KPP: theCYC charts, andYsolda’s charts.
Let’s do that together using myself as an example.
Here is the CYC chart, with my own measurements circled (or added in). What I hope this shows you is that any one person can have measurements spread across the sizing chart. If I were to pick the size that reflects my bust circumference (which is how patterns are most often selected), then I would be sacrificing fit in several places in my sweater, particularly around the shoulders and upper back (as I think you can see from the numbers!)
Follow the CYC’s guidelines for measuring and compare your own measurements to their chart to create your own sizing layout like I’ve done here.
Here’s Ysolda’s chart, which as you can immediately see is much more detailed than CYC’s. I’ve filled in most of my measurements, so you can see that Ysolda’s and CYC’s are both different from each other, AND different from me.
It’s with this information that I can start to form my general modification rules. From this I can learn that:
selecting a size based on bust means I’ll likely have to consider modifying different parts of my sweater (ie: no one size is going to fit me very well)
both these charts don’t go small/short enough for me in the upper back/shoulder area
both these charts don’t go short enough in the back waist length (though Ysolda’s is only 1″ longer, whereas CYC’s is 2″ longer)
there are other sizing issues I’ll have to consider that aren’t necessarily petite concerns, including bust adjustments and hip circumference adjustments
Understand (at least in a general way) different sweater constructions
We touched on this last week. Hop on over to that post for a more detailed look at some examples of different sweater and sleeve constructions.
Here I want to bring your attention to the fact that with general modification rules, you have to keep in mind that some sweater constructions function in a particular way to give you the style/shape and freedom of movement you see in the photo.
For example, with the information I’ve gleaned from the charts above, I can have a general modification rule that I need to shorten the sleeve depths on my sweaters. But, if I applied this to a set-in sleeve cap without considering that I have to equally adjust the body of the sweater itself, I’d end up with a sleeve cap that’s too small and incredible frustration all around.
To use the lovely Winter Doldrums as another example: this bottom-up, in the round yoked sweater. If I wanted to achieve the relaxed look of the sweater in the pattern photo, I’d have to consider the fact that while my body measurement tells me my sleeve depth is 6″, I’ll want to add some length to that. Otherwise, the yoke will sit further up in my armpit (possibly in an uncomfortable way!) and restrain my freedom of movement.
The garment schematic of Winter Doldrums tells me that the size I chose based on my bust has a depth of 9.25″ in the yoke. Decisions! How much length do I reduce, if any at all? How will that reduction in length cascade issues throughout the rest of the yoke?
Changing the rate of shaping will effectively change the angle of the shaping, which can conform to the angles of the body of be used to create a particular silhouette. In a pattern that is written to be shaped to the natural waistline there will often be quite rapid shaping between hip and waist and more gradual shaping toward the bust. If you want to move the waistline up you will probably want to work the more gradual shaping on the bottom half. 2
In this particular case, let’s say I want to take 1.25″ from the yoke depth. I’ve picked the size based on my bust measurement; I’m happy with the 35.5″ because I’ve decided I want a bit of a relaxed fit. Because of my own personal tastes, I’d considering making the waist about 3″ smaller. But that means I have to read through the pattern and see where the waist goes; the charts above tell me that the CYC sizing chart (which I know Knitty uses!) assumes my waist is 2″ away from where it actually is on my body. That’s a BIG difference when it comes to how a sweater sits on your body!
When I make those decisions and move up to the yoke, I now have to really consider how I’ll take out that 1.25″. The gauge says it’s 6 rounds/1″. So, I need to remove about 7 rounds. That doesn’t sound like a lot, but don’t forget about the beautiful colourwork! I could try to sprinkle those removed rounds up the chart, avoiding the decrease rounds, but it would be a good idea to draw out on knitter’s graph paper what the chart will look like if I do that. I might decide it interrupts the flow too much.
Another consideration I would have to make (and one common to petites) is narrowing of the shoulders/upper back. I might be tempted to just take out one whole repeat of the colourwork, but in this gauge that ends up being almost 4″. Taking those 4″ away at the base of the colourwork, around the upper arms and shoulders, would be something you’d have to consider even before approaching the bust measurement; I’d have to think about it way down at the waist, and before I even start the sleeves!
Remember: I picked a colourwork yoke sweater to show a complicated example. Please don’t let this keep you from looking at one for yourself! This is certainly something you can work out with some math and patience. We’ll be looking more at that next week when we talk about math, (im)modifiable design features, and your own personal taste.
General lists of petiteing tactics
Warning: PLEASE read above in Accurate Body Measurements! Here, I’ve listed a few very general suggestions of what petites can consider in regards to modifying fit.
First up, a source we’ve looked at in the past, Anne Marie Soto’s article in Vogue Knitting Winter 92-93, “Petite Pizzaz”. Note: Soto is coming from a homesewing point of view (we’ll be talking more about what the world of sewing can teach knitters next month). She writes:
petites should consider shortening the back waist length by 1″ (2.5 cm)
the fullest part of the hip is 2″ (5 cm) higher, which means it’s only 7″ (18 cm) below the waist as compared to the 9″ (23 cm) for regular sizes
sleeves for petites should be 1.25″ (3 cm) shorter
the shoulder length for petites is 1/8″ (3 mm) narrower (this measurement is from the back of the neck to the protruding bone on your shoulder)
She also suggests points of style and proportion. Please note that some of the suggestions below make me uncomfortable, but I’m posting them here in the spirit of sharing and learning together, as I think it’s important to take a look at the “conventional wisdom” for petites and take it apart together:
avoid bulky yarns, distracting fibers, and complex patterns because they can easily “downplay” a smaller figure
oversized dolman sleeves, extended shoulders, wide lapels, and large patch pockets are “inherently unflattering to a diminutive figure”
she warns to beware of “cutesy” details that are better suited for little girls, as these details are “too frequently considered the province of petites”
Soto instead suggests slim silhouettes, uncluttered sweaters with long vertical lines
I hope that by now, you know the philosophy behind the #KnitPetiteProject is that this is a body positive, non-judgemental community that accepts and supports the individual tastes, styles, and fit preferences of each #KPP person. So you understand why I’ve hesitated to include that last section of suggestions from the Soto article.
What do YOU think of this list? I know I’ve played with bulky yarn in the past. Here’s a photo and 2008 blog post as proof. Was that a mistake? Does it “downplay” my figure as a petite woman? I think that’s entirely a subjective point of taste.
Let’s move on to another set of guidelines, again from an expert in the sewing world.
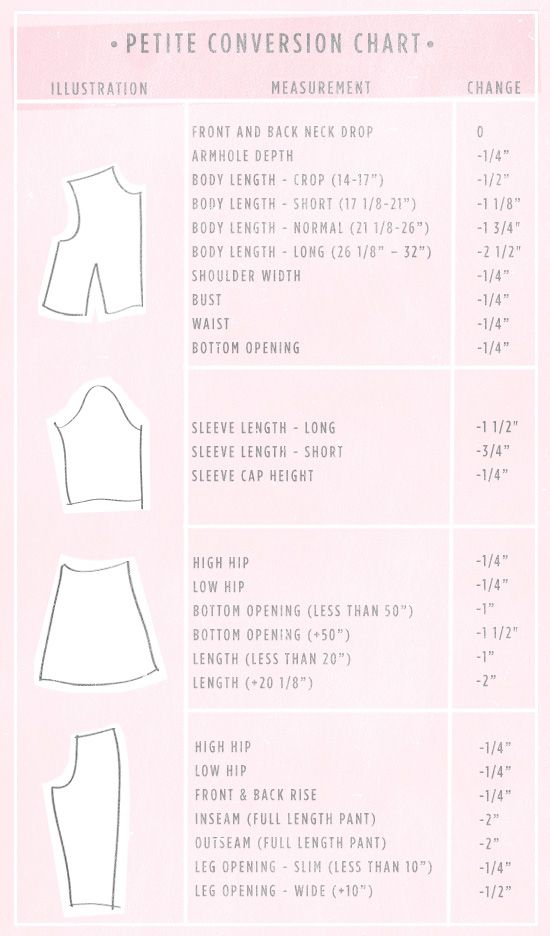
This general list for petiteing tactics comes from the the website Madalynne, created by lingerie designer, sewing teacher, and personal stylist Maddie. She’s kindly shared this handy chart that shows how, in the sewing world, petite sizing is different from regular sizing.
Every petite woman is petite in her own, unique way and these are standard reductions but I’ve used them as guidelines when working on my own patterns or helping petite women who email me with questions.3
Here is Madalynne’s chart.
This chart is property of the website Madalynne. Please note that the author herself says these are just general guidelines, and that “some critical thinking must be done when using this chart – what applies to you and where?”
And here is important information she’s shared about creating and using this chart for yourself:
petite clothing is designed to fit women around 5′ 3″ – 5’4″
Regular women’s clothing won’t fit petites because vertical measurements are shorter and would have to be altered to fit
Usually, changing a pattern for petites requires width reductions as well as vertical reductions, but of course that’s not always the case
Keep this chart in mind, as we’ll be talking more in depth with what the world of sewing can teach us knitters. For now, consider: does this chart reflect the comparison between your own measurements and the CYC standards?
Be willing to learn through doing
This is not the quick advice you might have been looking for! Mathematics and knowledge of your own shape and numbers is important, but also important is testing out some modifications with your own two needles, and understanding that this may require trial and error.
For example: swatching. Many folks don’t care for swatching. But it’s going to give you a lot of information. And, if you treat it as more than a gauge swatch, you can even learn things like:
if this is the right fibre/weight/colour for you to use
will stacking these decreases this close together look weird?
do I really dislike this technique? Am I going to really dread knitting this pattern?
are these needles and this yarn a good pairing?
what happens when I block it?
(and particularly for my example of Winter Doldrums): will this truncation of the colourwork look ok? How do I feel about the look?
As always, the #KnitPetiteProject is here to be as accurate, inclusive, and collaborative as possible.
Do you have some advice? Know of a source we should add to this post? Please reply here or, better yet, continue the conversation over on the #KnitPetiteProject Ravelry Group.
1 Amy Herzog refers to this as well in her excellent Craftsy class, Knit to Flatter. She clarifies and defines “Miss Average”, and states that while you will differ from Miss Average, you’ll “always differ in the same way”, so getting your numbers is a big and important first step.
This quote is inserted here because it is a great demonstration of the information and detail given to you as a petite knitter in Ysolda’s Little Red in the City book. While there’s no specific “petite-centric” discussion, you can absolutely find many bits of information that will help you understand design-important details for modifying the fit of your sweaters. You will have to understand what you need to alter, but once you do know that (through measuring, looking at charts, and your lifetime of buying and making clothes!) Little Red is an excellent source of fitting for petite folks.
In June, we’re focusing on tactics to petite your knits, always keeping in mind:
comparing petite measurements to “regular” CYC charts
“diagnosing” fit issues (posts in May)
deciding how we feel about fit (post from June 6)
determining tools to alter fit to our liking
learning to identify patterns that work for our taste and/or are easily modifiable
and very importantly, considering how we differ from a general sizing chart so we have a set of general rules to consider before we begin knitting a pattern1
This week begins our learning exercise with a particular pattern. I’ve selected Winter Doldrums from Knitty to act as my example; I suggest that you follow along with your own selected pattern, and talk about it in the #KnitPetiteProject Ravelry group here.
A valuable resource that outlines in a general way the way you can approach a pattern to ensure you get a fit you want is this post from Knitty, Knit Smarter, not Faster. While not required reading for the #KPP, I think it’s pretty great and has useful pointers for approaching any sweater knitting project.
Hallmarks of a Design you can Modify
At this point in the #KnitPetiteProject we’ve talked a bit about assessing our own needs and desires for the fit of our garments. Now, we’re going to look at how to achieve those needs and desires within a particular pattern.
I’ve selected Winter Doldrums for a few reasons: I know that Knittyfollows the CYC standards within their designs, it’s a pattern that is freely accessible to everyone so you can follow along with this exercise, and it’s a design that present a relatively complex and common issue that petite knitters encounter (shortening a yoke depth and having to interrupt a colourwork chart).
To approach this exercise, and every other pattern you want to petite for yourself, you can follow these steps:
have a knowledge of your own shape and how it differs from the most common sizing standards (CYC and Ysolda are widely used)
assess the pattern and see how it aligns with your own fit preferences
make sure your stitch AND row gauge are the same as the pattern; if they differ, you may still be able to work with the pattern, but you need to take this into account
READ THROUGH THE WHOLE PATTERN!
And now, check the pattern for the following:
pattern notes: do they include information about selecting a size (ie: suggested ease?)
pattern photograph: are the model’s measurements and the finished knit size given?
listed sizes: make sure you are clear on what the numbers actually represent. MOST patterns are supposed to give you the measurements of the finished garment, NOT the measurements of your body. This is a significant difference!!
is there any information about the sizing chart used by the designer?
garment schematic: what measurements are included?
how is length addressed within the pattern (ie: is it “knit in pattern for 5”, OR, is it “knit in pattern for 20 rows”)?
details about the construction of the sweater (bottom up? set in sleeves? seamless?)
make note of design elements within the sweater (cables? textured stitches? colourwork? lace?)
Suggested Ease
This is important to check for because ease makes a significant difference to the look and feel of the sweater. In some cases you may want to alter this, but if you selected the design because you liked the way it looked on the model, then double-checking the suggested ease against your own body and the information in the pattern is an important step in ensuring you’ll have the size of garment you want.
EXAMPLE: Winter Doldrums says, “shown in size L, worn with 1.5 inches of positive ease”.
Pattern Photograph
This information is tied to the suggested ease; sometimes it’s explicitly stated by putting together various bits of information within the pattern, ie: the model’s bust is 42″, and she is wearing size XL, and size XL has a finished bust of 45″, therefore 3″ of positive ease is suggested. Sometimes it’s more like what we have, which I included above, “shown in size L, worn with 1.5 inches of positive ease”. This is helpful, but I am making the assumption that the model’s bust measurements align with what the CYC says a size L is.
Listed Sizes
While it’s almost always industry standard to list the size of the finished garment and NOT the body it’s meant to fit, this is easily confused and sometimes you may encounter patterns where this is not the case. So, it’s always good to check.
EXAMPLE: I know that Winter Doldrums’s listed sizes are intended to be the finished garment because 1) it lists them as “Finished Measurements”, and 2) the garment schematic shares the same numbers as the listed sizes.
If you’re still unsure, you can do a bit of extra work and look at the number of stitches you’ll have at the bust, waist, or hips, and using the gauge, divide that number up and see if it aligns with the schematic. This isn’t always easy; you may have some unusual construction, or a design element that obfuscates that number in some way. But, in our example for this week, I can confirm the numbers this way:
EXAMPLE: Winter Doldrums has an easily-found list within the pattern itself of the number of stitches you have at the waist. For the size I’m looking at (35.5″), I see that the waist has 140 sts. The stitch gauge is 4.5/1″. So, I divide 140 / 4.5 = 31.1″. I can then look at the garment schematic and see that it indeed also lists 31″ as the waist circumference.
Sizing Chart
This is can be obscure information. Most of the patterns I’ve seen aren’t explicit about what sizing charts they use. If this is not listed on the pattern, sometimes it may be listed within the source material ie, if it’s from a magazine, then the magazine may have a general statement about what they use. This information may be tucked away in information for designers, that is, submission guidelines.
EXAMPLE: Winter Doldrums doesn’t list this anywhere on the pattern, but within Knitty’s pattern submission guidelines, it states in bright pink text at the top of the text: “Knitty requires all patterns to follow CYC sizing standards. Charts and full information can be found on this page.” And they link you right to the CYC website.
Garment Schematic
The more numbers, the better! Knitty can sometimes have only a handful of different measurements for a sweater, but it can also have many measurements listed.
This information is very useful to you as a petite knitter because it’s going to give you the most power to modify; it’s going to explicitly show you what the designer was going for, especially in the vertical measurements. Remember: as much as it’s annoying and sometimes difficult, knowing your row gauge and getting it as close to what the pattern wants is significantly tied to your vertical measurements!
EXAMPLE: Winter Doldrums gives me the neck, bust, waist, and upper arm circumference, and the yoke depth, sleeve length, and body length.
Significant to this sweater construction is that yoke depth. We’ll talk a bit more about that below in Sweater Constructions.
How is Length Addressed in the Pattern?
Opinion is divided within the designer world on this point.2 Some believe you should always list the number of rows to be worked, where others believe you should just give the length that needs to be knit. That is, are you instructed to knit for 5″, or are you instructed to knit for 25 rows?
You find this point on this list because I think it’s important to draw you attention to it: you may have a personal preference, and being presented with the opposite might pose a problem, or at least an extra step, in your modifications.
EXAMPLE: Winter Doldrums states how many rounds you must knit, rather than how many inches. This means that when I’m reworking the lengths (particularly the yoke), I have to go through the pattern and note how the length progresses throughout the yoke, and how it lines up with the shaping and colourwork that happens at the same time.
The Construction of the Sweater
There’s myriad reasons why this is important, from personal preference to ease of modification. But at the very least, knowing the construction of the sweater means that it’s easier for you to read and understand as you examine it for all the previously-listed hallmarks. You should also try to assess shaping; that is, if there is any shaping, and how the shaping is achieved. Sometimes it’s through changes in gauge, but most often you’re likely to encounter stitch increases or decreases at the side seams, it can also be one quick succession of increases/decreases in one row, or spread out across the front or back of the sweater, etc…
EXAMPLE: In Winter Doldrums, the pattern introduction says the design includes “waist shaping, fitted sleeves, a loose cowl neck”. It doesn’t explicitly say that it’s bottom-up and seamless, but I can see that that is the case by reading through the pattern. Skimming down through the pattern, I can also see that the waist is shaped in from the hips evenly at the side seams over about 4″ of length. For petites, this is particularly important! Please do not overlook this sort of information!
Types of Sweater Design
Sometimes you can’t help what sweater you fall in love with! Here is a quick and handy list of different sweater constructions3, and what you should look out for when considering each for your petite modifications. Nothing is impossible to overcome with work, math, and dedication. But, some may be easier than others.
This list is only for the construction of the sweater; any sweater can have complicating factors such as stitch patterns and colourwork. When appropriate, notes on those points will be included.
I’ve included images of some of my own designs to illustrate these sweater constructions.
Direction of Knitting
Top Down: quite popular in recent years, particularly with seamless designs. Top down sweaters mean you get to deal with the shoulders first, and as we’ve noted in the #KPP, fitting the shoulders is crucial. You also get to try it on as you go, which is reassuring (particularly when you’re first entering in the uncharted waters of petiting for yourself). You’ll find top down sweaters in raglans, contiguous constructions, and yoked sweaters, among others.
Bottom Up: a classic style, bottom up is often found in vintage patterns, and is favoured by many knitters (particularly when paired with a seamed design, because it allows for extra structure within those seams). You’ll find bottom up sweaters in set-in sleeve garments, yoked sweaters, and drop shoulders, among others.
an example of a side-to-side sweater, The Writer’s Top. Note the extra fabric bagging under the arm and the simple side seam.
Side-to-Side: usually (but not always), these sweaters are oversized and/or have less waist/bust shaping than other sweaters. For petite knitters, these pose a different kind of modification challenge, though not necessarily a more difficult one. Side-to-side sweaters mean that your vertical measurements are now measured through stitch gauge, not row gauge. You’ll find side-to-side sweaters mainly in oversized, drop shoulder type of designs.
Other: there’s SO many ways you can create a sweater! And sometimes the more radical the look, the more tricky to modify (though not impossible!) An example is a modular sweater; something that might be knit from the centre-out, or perhaps made up of many different hexagons that are sewn together. Your petiting-challenge would be tricky, but not impossible!
Shoulders
Read more about sleeves and shoulders in detail here on Knitty, Thinking Beyond the Pattern, Ravellings on the knitted sleeve part 1, part 2, and part 3.
Drop Shoulder
an example of a drop shoulder sweater, Draperie. Note the colour change at the bicep; this shows you how “dropped” the shoulder is.
This is a very simple sweater construction. It creates sleeves that stick out at right angles from the body of the sweater. Because of this, it means you get excess fabric at the armpit, and (if sleeves are seamed in), a shoulder seam that sits closer to your bicep than your shoulder. These tend to be oversized sweaters; think the big knits of the 80s.
Look for this construction if:
you like positive ease/oversized knits
you’d like a gentle and relatively simple introduction to petiting your knits (you can easily make shoulders narrower and/or shallower, you can simply reduce length)
Think twice about this construction if:
a very fitted style is important to you
Raglan
Usually a top-down construction, raglans are often suggested to new knitters as a good first sweater because of that try-it-on as you go option. Raglans make room for your shoulders by creating a set of stacked, slanted lines of increases from the neckline down to the armpit.
an example of a sweater with stacked shaping along the sleeve, Corona.
Look for this construction if:
you have shoulders that align with the length, breadth, and depth the pattern assumes. This means you have an easily memorized increase pattern for your sweater that will be easy to try on as you go.
Think twice about this construction if:
you have narrow or sloping shoulders (raglans can sometimes assume a lot more shoulder than you have, thus you’ll end up with way too much fabric pooling around your armpits)
you have a shorter vertical measurement in your sleeve cap depth than the pattern assumes (a raglan relies on a certain length of sleeve cap in order to get from the neckline circumference to the circumference at the splitting of the sleeves from the body. If you need to change this, it means those already-rapid increases will have to be even more rapid, and that might create sharp points that juts out in your raglan sleeves)
Yoked
an example of a very plain yoked sweater, TPCT. Note the little “dots” across the upper chest and shoulder. These are the shaping. You can see how they “radiated” out from the neckline, and how many of them there are!
These sweaters spread the shaping for the upper chest and shoulders out across that whole area. Depending on the direction of the knitting, the increases or decreases are very smooth and dot across the chest, back, and shoulders. These sweaters are often seen in beautiful colourwork designs, and are very popular because of this and the fact that, when knit top down, they are also a try-on-as-you-go sweater like the raglan listed above.
Look for this construction if:
your petite needs may be on the lower half of your body, OR
you’re not afraid of the possibility of a lot of math! OR
the yoked sweater does not have a complex stitch pattern across the yoke (this is unusual to find, but not impossible)
Think twice about this construction if:
you want to avoid complexity in math and design detail alterations. That beauty in a colourwork yoke relies on a rigid amount of assumed length in your yoke depth; this means that any length you want to remove from that area (important to petite people who often encounter this vertical length issue) will be complex, and you may have to chop off some of the design, or alter it significantly to make it flow. This is complicated further if you also want to narrow the shoulders.
the example I’m using for this exercise, Winter Doldrums, is a bottom-up colourwork yoked sweater.
Set-in Sleeves
an example of set-in sleeves, Lynch Pin. Note the seam line running up and across the shoulder. ALSO note that it is not sitting AT the shoulder, because the model is petite and has narrow, sloping shoulders.
These types of sweaters are often paired with a bottom-up construction and are usually knit flat in pieces, and seamed (front to back, arms to body, and sometimes the entire length of the arm itself). Amy Herzog is a big fan of the seamed, set-in sleeve sweater; her Knit to Flatter class and CustomFit software have been mentioned a lot in the #KPP because these resources are focused on getting you a fit that works with YOUR body. Herzog likes this construction because the seams provide stability, it’s the easiest to modify (IF you’re working with a base size, which many petites may not be) and because it’s in pieces, it forces you to have a plan for everything before you start. It also allows for less to rip out if you make a mistake (ie: your bust darts didn’t work out? You only have to rip out the front of the sweater, not the back and the arms too!)
Look for this construction if:
you want to focus on the structure of a fitted sweater that will teach you a “classic” form of fit (ie: the seams will sit on your body in very specific places).
Think twice about this construction if:
you need to see the progress of your petiting mods and want to try it on as you go
you want to first practice and understand the way your petite mods work with “standard” sweater sizing charts; as Herzog notes, this construction forces you to have a plan for everything before you get started!
Saddle Shoulder
This construction is a bit of a hybrid between a set-in sleeve and a raglan. It creates a straight line that runs along the top of your shoulder, allowing a design element (like a cable) to run all the way up from the sleeve cuff to the neckline, while maintaining a sleeve cap fit that is closer to the body. You can see an outline of it here on Carol Feller’s blog, Stolen Stitches.
Look for this construction if:
you want the option of top down or bottom up; you can make this sweater either way (and like the others, the top down version means you can try it on as you go)
Think twice about this construction if:
the length of your shoulder doesn’t align with the design as-is; some sources note that this style may lead to baggy underarms.
Contiguous
This is a fun method of knitting the sleeve caps and shoulder seams from the top down.4 It’s become popular lately because of how much people enjoy top down sweaters. Contiguous sweaters allow for neat design elements that might not be as simple or possible to create if working with a different top-down construction. It also creates a gentle slope to the shoulder in a way that (I would argue) is simpler than, say, a seamed, set-in sleeve sweater would.
Look for this construction if:
you’re ok playing around a bit with the shoulder shaping: keep in mind that those shoulders are the first thing you’re doing, so frogging back means losing less time, and it allows you the ability to try-it-on as you go.
Think twice about this construction if:
you haven’t tried it before; but don’t be afraid! As Susie Myers herself suggests on her free pdf download, “a good way to get a feel for this method is to try the Mini-Sampler KAL“. Creating the mini-sample means you can picture this construction, and moving forward with modifications will be an approachable task.
Complicating Factors: Stitch Patterns and Design Elements
The simplest sweater for you to select for practicing your petite modifications would be something in plain old stockinette, with perhaps some ribbing along the cuffs and edges. But let’s be real: most of us knitters like the fancy stuff in our FOs! Stitch patterns and other design elements are likely a big part of what attract us to a particular sweater.
But, those aspects need to be considered when we’re looking for hallmarks of a sweater pattern we can modify. Pattern elements that take place over a large number of stitches and/or rows are going to make your modification more difficult (depending, of course, on what/how many mods you need to make). Here’s a short list of some of the things to look out for and make sure you consider when selecting a pattern to petite.
Cables
are they all-over cables?
how long is the cable (or cables!) repeats? how easy will it be to shorten them? will they look unattractive if you chop them off in a particular place?
what’s the stitch gauge in the cable pattern? (cables pull stitch gauge inwards)
how many cable repeats would you have to add or remove to get the width you want? Does this throw any balance in the pattern off? (ie: an uneven number of cables?)
do you need to create something like bust darts? If so, are the cables in the way? Can you work around them?
Lace
this all-over lace pattern in Lady Bat means you’d have to consider the stitch and row repeats across all shaping in the sweater you want to modify.
the number of stitches within a lace repeat can sometimes change within that repeat: where do you have to cut off the lace? Will there be too many (or too few?) stitches at that point?
bust dart considerations (as outlines under CABLES)
how long is the lace repeat? how easy will it be to shorten? will it look unattractive if you chop it off in a particular place?
how many lace repeats would you have to add or remove to get the width you want? Does this throw off any balance in the pattern?
Textured Stitches
these can be complex, and occur over many rows to complete a repeat, but they can also be very small. Either way, you have similar concerns with textured stitches as with the lace and cables listed above.
a relatively simple example is ribbing; even a 2×2 ribbing takes up repeats of 4 sts, and depending on the design, that might be 4+2 sts, or 1+4+1 sts. It can be chopped up in a number of ways to fit into the aesthetic and function of the design to consider things like selvedge seams, or split edges, or other finishing details like i-cord edges, lace trim, etc…
Colourwork
this colourwork running along the yoke of Cherry Pie is a combination of stranded and intarsia. NOTE how the shaping is stacked perfectly above the “peaks” of each diamond. This is something you would have to consider when petiting a pattern.
colourwork is often very graphic; it “paints a picture”; will you have to chop off this picture to shorten parts of your sweater? This is the case with both stranded and intarsia designs.
in a yoked sweater, you have to increase in both width and length as you’re working from the top down; the designer has very carefully inserted increases within and between the colourwork. How will you account for this in your petite modification mathematics?
EXAMPLE: In Winter Doldrums, I’m presented with a beautiful colourwork yoke that, according to the size I would like to create, is about 1.5″ too long for my preference. What do I do? We’ll look at the particulars of that in an upcoming post this month.
NEXT WEEK: Our topic is “Are there general modification rules we can follow when looking at a pattern we want to modify to our personal petite-ness?” Keep that pattern you selected in hand because we’re going to be looking at it again til July!
Question
How does YOUR selected pattern score on this list of hallmarks? Share about it in the #KnitPetiteProject thread here!
1 Amy Herzog refers to this as well in her excellent Craftsy class, Knit to Flatter. She clarifies and defines “Miss Average”, and states that while you will differ from Miss Average, you’ll “always differ in the same way”, so getting your numbers is a big and important first step.
2 Many contemporary patterns will give you the length in rows/rounds. Elizabeth Zimmermann, writing in Knitting Without Tears (1971), states, “Some directions give you the vertical row gauge as well as the horizontal stitch gauge. I have yet to find a good use for a vertical row gauge, since vertical measurements are much easier to handle in inches.” pg 49.
In May we touched on diagnosing fit issues, and comparing them to the often utilized CYC sizing charts.
In June, we’re getting focused on tactics to petite your knits, always keeping in mind:
comparing petite measurements to “regular” CYC charts
“diagnosing” fit issues
deciding how we feel about fit
determining tools to alter fit to our liking
learning to identify patterns that work for our taste and/or are easily modifiable
and very importantly, considering how we differ from a general sizing chart so we have a set of general rules to consider before we begin knitting a pattern1
This week’s topic is big and unwieldy; we’re all different in so many ways, that sets of rules will never cover everyone entirely. In order to determine our personal variety of modifications and how we differ from sizing charts, each of us has to:
look at our own shape and become familiar with it
understand the fit we want to achieve
look carefully at the constructs we are presented with (that is, understand in general what size and shape patterns are likely to assume we are)
I insert this quote not to make you feel intimidated, but instead to emphasize that we’re all different, and that you always have to check the evidence your body gives you against any guidelines.
Look at your shape and become familiar with it
Our end goal is to be proactive in our choices and alterations of knitting patterns so that we can make informed decisions before purchase, and have an understanding of what we can and want to alter within any given pattern to deliver our desired fit.
To make that happen, a good first step is to be aware of our own body’s shape; this is not necessarily easy or simple to know! Just think about what we’ve already addressed in the #KnitPetiteProject, and the evidence given to us through the responses to the fit survey!
Because this is such a hugely variable topic, it’s useful to have an example to point to. And of course, I can always find a willing participant in… myself! So forgive me for splashing my face here again in order to illustrate a point.
One of the tools I’ve used to help gain some objective perspective on my own shape is creating a Body Graph through the methods outlined in Alto and Palmer’s book, Fit for Real People. I’ve referenced this book before; I know we’re all knitters here, and that this is a book for sewists, but I still want to recommend it to you all as a great source of information about fit and gaining an understanding of your shape and diagnosing fit issues.
You’ll find the information on creating the graph on pages 61 – 73. The value in getting this book and doing this for yourself is that you get:
step-by-step instructions on creating the graph
points on interpretation, allowing you to understand how your own shape compares to the sizing standard that the authors are referring to (in this case, the charts used throughout the home sewing industry)
and perhaps most importantly, the authors share a number of real life examples which serve to illustrate how everyone deviates from a sizing chart, and provides tips for sewists (and maybe even knitters, we’ll get to that in July!) on how to take control of fit
Plus, I think it would be a fantastic exercise for us to share about in the #KnitPetiteProject Ravelry group so we can all learn together!
So, here’s my experience creating the graph, interpreting it, and how I want to use this information moving forward.
Creating the Graph
From start to finish, the graph took about 45 minutes to set up and create. The tools I needed were:
a sharp pencil
a rigid ruler (I used a yardstick)
a chain necklace
a belt/piece of string
about 6.5′ of brown craft paper
tape
scissors
a contrasting colour pen
a bit of blank wall space
a willing friend!
I’m not giving away all the steps and charts, as that’s copyright material from the book. But I will say that they guide you very clearly through how to stand, how to get your friend to mark your shape at about 10 different points, and then how to subsequently fold up that paper into 8 equal chunks for interpretation.
You may wonder why we need a belt and a necklace? Wearing those two items helps to mark out a couple points on your body that would otherwise be a bit tricky to note (where your neck meets your shoulders, and your waistline).
Interpreting the Graph
As I mentioned earlier, the authors of Fit for Real People are using the home sewing sizing charts as their comparison. These aren’t exactly the same as every knitting pattern you’ll come across, but because they give you a firm set of numbers, you can compare this information against whatever information you find on a knitting pattern schematic.
There’s useful interpretive information sprinkled throughout the book, but the pages most directly connected to this are 67 – 71.
By creating this chart and reading the interpretation from the book, I’ve had some ideas about my own shape reinforced, and I’ve learned some new things as well, including:
the slope of my shoulders (shoulder shape is important to fitting a sweater!)
the proportion of my legs to my body (important for understanding more about torso length for your sweaters!)
the location of my waist compared to my underarms, and the depth from my shoulder to my underarm (important for getting yokes and sleeve cap depths correct!)
what my general shape objectively is (flatly, on paper!) (which can help in your understanding of aesthetics and proportion, a discussion we may have later on in the #KnitPetiteProject)
Me with my Body Graph!
Body Graph, post-folding
How I’ll use this information moving forward and why you should try it too
In the book there’s a full Body Graph worksheet where you can input all the interpretations of your shape (ie: short waist, sloping shoulder, etc). This is a tool I can return to in order to consider proportions, but also, and most applicably to us knitters, the Body Graph can be an incredible resource of the information needed to achieve fit goals in a very visual way.
The graph gives you a 2D visualization of your shape, but upon it you can also note the 3D measurements that are important to fit and sizing. As I listed above, it gives you an understanding of those vertical measurements and your proportion (ie: short waisted? broad shoulders?).
It’s also relatively easy, inexpensive, and low-tech to create. I’ve tried doing similar shape-interpretation exercises with photographs; these are interesting, but I’ve found them more time consuming and ultimately less accurate than an actual tracing of your own body.
I’ll be using this graph throughout the rest of the year in the #KnitPetiteProject to illustrate how we can take control of our knitting and get the fit we want. On a personal level, I’ll be using these charts to re-examine my choices and aesthetic preferences, along with deciding on my personal variety of modifications along with the information we touched on in May.
Understand the fit we want to achieve
We’ve already talked about how fit is both objective and subjective. We each have different tastes, style preferences, lifestyles, comfort-zones, emotions, occasions, etc…
To help us think a bit more deeply about the fit we want to achieve, I’ve created the small questionnaire below. By filling this out, you can gain a bit of perspective on what you like in your clothes, what you wear most, and subsequently what you feel may need to change (if anything at all!)
Look carefully at the constructs we’re presented with
All this preference and shape examination is wonderful, but to get at the heart of our issues as petite knitters we need to know what and where the fit gaps are. In May we touch on diagnosing these issues; here, I want to encourage you to not only look at the CYC numbers, but also a specific pattern design.
Picking a specific design will act as a learning exercise for us over the next 3 weeks in June. This design can be something you have already knit for yourself, or it can be something new to you. With this design, we will:
take the information we’ve gathered about our shape and fit preferences and compare it to the pattern
identify any gaps in the body shape the pattern assumes and our own body, including how to determine the shape the pattern assumes
evaluate the pattern (what information does it include? what does it lack?)
learn to dissect pattern information in order to rework it to our liking
We’re getting very practical and hands-on this month! Come next week to the #KnitPetiteProject prepared with your chosen sweater pattern and your measurement, shape, and fit preference information! I’m looking forward to working and learning with you.
KnitPetiteProject. Fit Survey. Accessed June 5, 2017.
Palmer, Pati and Marta Alto. Fit for Real People. Palmer/Pletsch Publishing; 2 edition. September 2006.
1 Amy Herzog refers to this as well in her excellent Craftsy class, Knit to Flatter. She clarifies and defines “Miss Average”, and states that while you will differ from Miss Average, you’ll “always differ in the same way”, so getting your numbers is a big and important first step.
2 Palmer, Pati and Marta Alto. Fit for Real People. Palmer/Pletsch Publishing; 2 edition. September 2006, pg 127.